Encoding for Live Streaming
When getting started broadcasting live video streams, people often ask what equipment or software they need. Many people think all they need to stream live video is a camera, a microphone, an internet connection, a computer, and a video streaming solution. While those components are necessary, there’s one more aspect that’s just as crucial–encoding for live streaming!
That’s where this article comes in. First, we’ll introduce you to live stream encoding software and how it works. Then, we’ll take a look at delivery method options for live streaming. Finally, we’ll cover formats and protocols used when encoding for live streaming, as well as on-demand video archives created by an encoder.
Our goal is to bring you up to speed on the basics of encoding for live streaming, as well as to demystify the concept of encoding video content.
What does encoding for live streaming mean?
Encoding for live streaming allows viewers to watch your video content from their own video players. How? A live streaming encoder sends your source video to your streaming service provider, like Dacast, for distribution. Real-time encoding decodes your video content and re-encodes it into streamable content.
 We’ll take a look later in this article at software and hardware options to consider when encoding for live streaming.
Why do you need to do encoding for live streaming?
The video you capture on your camera may not always play correctly on every video player. Sometimes you may capture a video in a format that’s not compatible with a streaming service. This is where encoding for live streaming becomes essential. A hardware encoder or encoding software can convert your video feed into an optimal format. And that means that you can focus on creating great content for your viewers.
How to do encoding for live streaming?
As mentioned above, you’ll need a live streaming encoder to broadcast live video. There are many different options, including hardware or software encoders, and free or professional encoders. It all depends on your needs.
A professional encoder will cost some money, but it is often worth the cost. It can be ideal to work with a professional streaming platform that grants you access to an encoder in-house (i.e. Dacast, UStream, etc.). One of the more popular methods of encoding for live streaming is via the Wirecast encoder. Wirecast, and other software encoders like it, give you increased frame rates, higher quality through newer codecs, and full encoder settings.
(If you want a slightly more technical look at encoding for live streaming, you can review this article on Wirecast Pro video broadcasting software.)
What are the delivery methods for live streaming?
You can deliver encoded streams via Real-Time Messaging Protocol (RTMP), Real-Time Streaming Protocol (RTSP), or Hypertext Transfer Protocol (HTTP) streaming formats. These formats represent streaming technologies from Adobe, Apple, and Microsoft, respectively.
Let’s talk now about RTMP, RTSP, and HTTP, including the offshoots of this method, in a bit more detail.
1. RTMP
RTMP is an Adobe Flash Player protocol for delivering real-time video.
This real-time messaging protocol uses an IP connection or a polling HTTP tunnel. The RTMP protocol is a container for data packets. This might be in Action Message Format or in a format called raw audio/video data. The latter is found in the Flash Video Format.
Macromedia originally developed RTMP, before Adobe purchased the technology. In 2009, Adobe released the specifications of RTMP. These are accessible for both CDNs and companies to create their own implementation of the format. Additionally, Adobe has maintained the original RTMP format as a popular protocol for broadcasting. Here at Dacast, we use RTMP-enabled
Note that most of the video streaming platforms use RTMP stream ingest to then deliver HLS streaming. Here at Dacast, we use RTMP-enabled encoders to ingest HLS for live video streaming.
2. RTSP
RTSP is a network-control protocol. You can use this option to create streaming sessions between a server and a client. The format is a PULL technology, and it requires the user to initiate a session. When comparing RTMP vs RTSP, we often see RTSP in IP Cameras with H.264.
RTSP is the default format for streaming Windows Media. It’s important to note that there is also a streaming protocol called MMS (Microsoft Media Services). MMS is an older format that Microsoft dropped in 2008 in favor of RTSP.
HTTP, HTML5 and HLS
 HTTP is the most used streaming protocol online. Almost every live streaming CDN supports HTTP. For context, CDNs (content delivery networks) distribute your video content to networks around the world without clogging your own servers. CDNs can deliver video content to your viewers via the closest available server to each viewer. Since HTTP is the most commonly used streaming protocol, you will likely have no problems with firewalls and caches when using this option.
Apple has become a chief proponent of this format through its HLS (HTTP Live Streaming). Apple’s support has helped to make this the default method to reach mobile devices. However, HLS feeds do require several seconds of chunked playlists to start. As a result, there is a delay in the live feed with HLS.
This kind of delay is called “latency.” Latency does not necessarily occur to this degree with the other methods. If latency is a concern for you, you’ll want to consider the pros and cons of each protocol before making a decision about encoding for live streaming.
Which format/protocol should I choose?
At this point, you’re probably wondering now how to choose the right video streaming protocol for you. Bandwidth requirements between the live streaming formats discussed above are similar. There is a very slight variance in the overhead above the rate at which you’re encoding video. However, it’s not a significant variance. HLS has a drawback in its latency, but it’s the definitive format for reaching mobiles.
 Today, most mobile devices prevent the playback of Flash. As a result, most viewers stream video via the HTTP/HTML5 format. We expect this trend to continue in the coming years. For example, Cisco predicts that by 2019 online video will account for 72% of all mobile data traffic.
That said, your service provider can convert formats for you. Dacast, for example, converts RTMP into an HTML5-friendly stream. This is an important factor to consider. Overall, the format you choose is less important than what your chosen streaming platform supports. Most streaming platforms are based around RTMP or Windows Media. Likewise, most services (including Dacast) can automatically convert for mobile delivery.
Takeaway: Check with your streaming service provider about its live streaming encoder format preference. Also, determine how that service handles mobile delivery.
Which encoder settings should I choose?
Let’s say you’ve selected your format and compatible method of encoding for live streaming. What else do you need to consider? Most importantly, you’ll need to change the encoder settings according to your preferences. First, you’ll want to play around with the live streaming encoder settings to get familiar with the options. You can also opt to choose the preset settings, assuming they meet your needs.
The bitrate you select is directly related to the quality of the video you broadcast. Keep in mind that the higher the bitrate, the faster your viewers’ upload speed needs to be. Generally, you don’t want to broadcast with a bitrate that is more than half of your upload speed. Don’t know your upload speed? Run an upload speed test here.
Takeaway: Broadcast your stream with a bitrate no more than half of your upload speed.
What about cross-device video compatibility when encoding for live streaming?
As mentioned above, there are many different video formats, and not all file formats are compatible with all devices. Each format also entails different variables. There are container formats, such as MOV, FLV, or MP4. These container formats consist of different video and audio codecs. Typical video codecs include H264, VP6, and ProRes. Audio codecs include MP3 or AAC.
An encoded video contains two basic parts: the codec and the container format. A codec compresses the video you captured and the container format is the output of that compression. Think of the container format as a box and the codec as the items you put inside the box.
Most encoders, like Wirecast, let you specify the container format. For example, you can select MP4 as the container type.
How to optimize your video format for multiple devices?
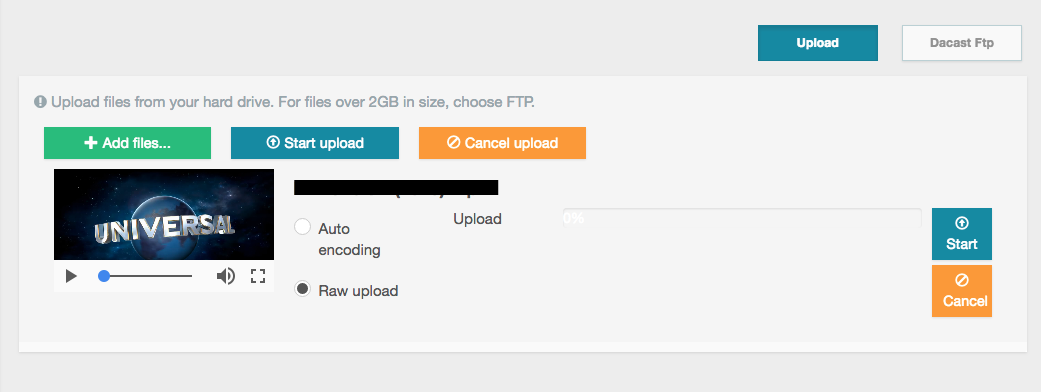
When streaming video content, you need to make sure that your video format is optimized for most devices. With Dacast, we recommend MP4 video format with H264 and AAC (the video and audio codec, respectively). Dacast also includes an auto-encoder feature (shown below) in its video-on-demand service. You still have the option to upload a raw video file. Alternatively, you can use the auto-encode feature to automatically make your video compatible with the player.

With Dacast, you can also change the bitrate and resolution of your video file after you upload the file. The Dacast multi-bitrate feature supports 1080p, 720p, 576p, 480p and 240p resolutions. Each has a comparable bitrate quality. Remember: the lower the resolution, the lower the bitrate.
(For more information on multi-bitrates for video files, take a look at our article on multi-bitrate streaming.)
Takeaway: Consider auto-encoding and multi-bitrate settings to reach as many viewers on unique devices as possible.
Conclusion
So there you have it–the basics of encoders and encoding for live streaming! In this article, we’ve covered why encoding for live streaming is necessary for the compatibility of video formats for your viewers. We’ve also considered viable options for live streaming protocols. Overall, you want to ensure that you encode your video files in the optimal format so that your viewers are guaranteed the best quality video possible.
Feeling confident with the basics and ready to dig in a little deeper? Take a look at our article on the best encoding software settings. For regular tips on live streaming and exclusive offers, you can also join our LinkedIn group.
If you’re not yet streaming with Dacast, you can give our 14-day free trial (no credit card required) a try. Click the link below to sign up and start streaming today!
Thanks for reading, and feel free to share your questions and feedback in the comment section below. We love to hear from our readers!
By Philline Managuelod.
 Stream
 Connect
 Manage
 Measure
 Events
 Business
 Organizations
 Entertainment and Media
 API
API Tools
Tools Learning Center
 Support
 Support Articles

