There are two options to find your videos uploader.
Option 1
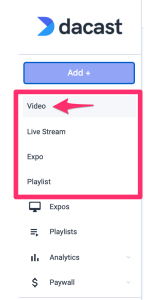
By clicking on the “Add +” button at the top of your left menu:
And selecting the “video” option in the dropdown as shown below:
Option 2
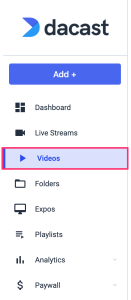
Or you can also click on “Videos” on the left-hand menu:
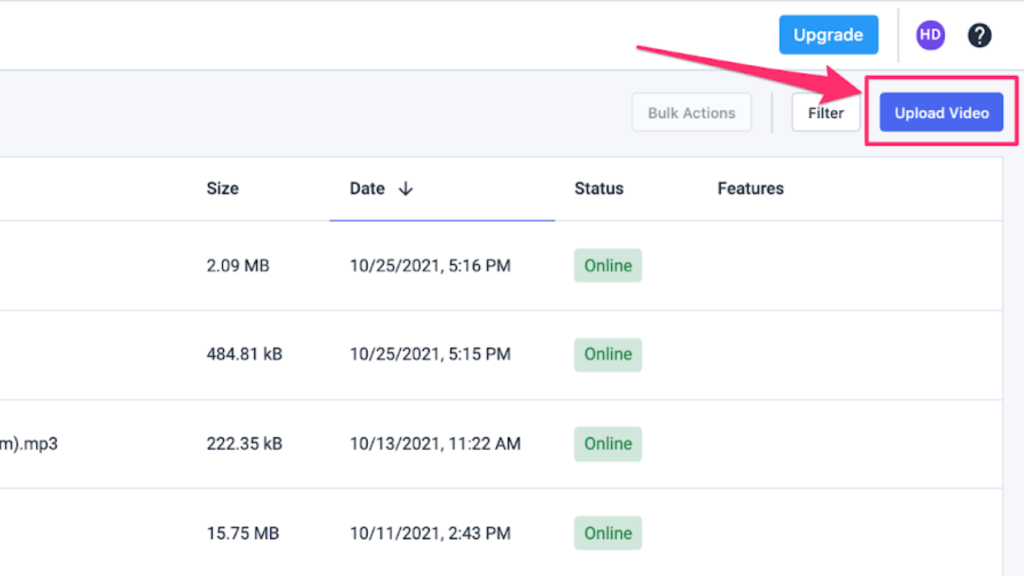
And then by clicking on the “Upload Video” button available on your right-hand side:
Note that Dacast offers 2 methods to upload your videos to your Dacast:
Video uploader: select an individual or group of files from your device.
Bulk upload: bulk selection of videos from an S3 bucket (AWS).
Method 1: Video Uploader
After completing the previous steps, you see the following screen:
You will have two options to upload your videos:
Drag and drop your file(s)
Click on the “Browse Files” button to browse on your device.
Note that you can select Dacast standard encoding recipe or your own recipes by clicking on the dropdown as shown below.
Check out this article to learn more about encoding recipes (renditions and bitrates).
While your videos are uploading, you will be able to perform different actions at the same time, such as:
Changing your video title as shown below.
You can travel within the app and keep working while your videos are uploading without needing to stay on the uploader page.
Check out the progress of your uploads by clicking on the arrow icon of the uploading window, as shown below.
Once uploaded, you will be able to copy and paste your embed codes and share link by clicking on the copy icon as shown below. Finally, you will be able to click on your videos from the uploader or the uploading window (as shown below) and edit your video metadata directly from there.
Method 2: AWS S3 Bulk Upload
This feature allows customers to upload a large number of files or single large-sized video files hosted on AWS S3.
You will need to enter your credentials from AWS S3 to initiate the bulk upload to your Dacast account.
Note that the credentials must be entered exactly as it is shown in your AWS console. Before moving forward, we invite you to review how to create an AWS S3 bucket in this article.
Now, let’s take a closer look at each one of these credentials and how to get them step by step:
Upload Name: this input will help you track your bulk upload with your wording. Feel free to apply your own name; this is nothing related to AWS S3. Example of a valid upload name: My first bulk upload
Bucket name: Sign in to AWS (Amazon Web Services) and go to your S3 Management Console. Click on the name of the S3 bucket from the list. If it’s still in its default access state, it should say “Buckets and objects not public” next to it. Example of a valid bucket name: my-hosted-content
Region: On your AWS account, click on the desired S3 bucket name. Click on Properties Tab at the top. Now you will see Region for the selected bucket along with many other properties. Example of a valid region: us-east-1
AWS IAM Access and IAM Secret Token – Open the IAM console. – From the navigation menu, click on Users. – Select your IAM user name. – Click User Actions, and then click Manage Access Keys. – Click Create Access Key. Example of a valid IAM Access key ID: AKIAI7SFOCTF7EXAMPLE Example of a valid Secret access key: wKalrXUtnTOTO/K7MDENG/bPvRfiCYEXAMPLEKEY
Please note that for security matters, your AWS S3 credentials are encrypted and will be deleted from our database after 24h of inactivity on the dedicated bucket.
Add metadata: this option allows you to personalize metadata on the bulk upload contents through a .csv file. The CSV file has to be structured as follows: FilePath;Title;Description <FilePath including extension (eg .mp4)>;<Title>;<Description>;
Upload Your Files from Google Drive
We understand how tedious it is to individually upload dozens of files one at a time. Let our Google Drive bulk upload tool save that hassle for you.
This feature allows customers who have plans with this feature to upload a large number of files or one or more single large-sized video files hosted on Google Drive.
Go to Upload Video and select Google Drive.
2. Select your Google account.
3. If you want to upload an entire folder of videos, click the desired folder, and then select.
4. If you want to upload multiple videos within a file, double click the file name, hold the Command button and click the files you would like to upload. Then click select.
5. You will get an email notification as soon as your files are uploaded.
Any questions or need help/access to this feature? Please contact us.
Not yet a Dacast user, and interested in trying Dacast risk-free for 14 days? Sign up today to get started.
Harmonie is a Senior digital marketer with over 6 years in the Tech Industry. She has a strong marketing and sales background and loves to work in multilingual environments.