If you’re a vendor for a live streaming encoder, we invite you to integrate your encoding tool with the Dacast platform to make it easier for users to configure your encoder.
Whether you offer a hardware or software encoder, the Dacast Encoder API lets you greatly reduce the complexity of live streaming by pre-configuring your encoder with the required settings.
If you are interested in integrating your encoder with Dacast, please contact us and we will be happy to help you from start to finish. However, we have put together this guide to give you a start.
Using the Dacast Encoder API
Dacast provides an API for getting channel details for a specific user in the platform:

- Fill in “ENCODER” with the Dacast-given name of your encoder
- Fill in “KEY” with the API key that your users will find in “Dacast” > “Preferences” > “Encoder Keys”
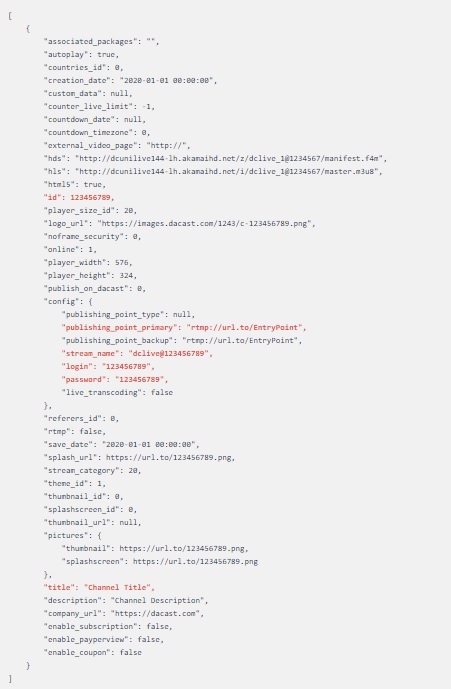
The response will be a JSON array of objects, one per channel.
Here is an example with the most important details highlighted in red:

Using these details, your live streaming encoder can configure itself using the following at a minimum:
- id: The unique identifier for the channel (the title may change but this will always remain the same)
- publishing_point_primary: The URL to which the stream should be sent
- stream_name: The name of the stream at that URL
- login: The login for stream authentication
- password: The password for stream authentication
- title: The name of the channel, which should be presented to users
Finally, your live streaming encoder must configure itself to match one of our supported Live Encoder Configurations.
Example Encoder Integration
From the perspective of your users, the process is very simple. All they must do is get an Encoder Key from the Dacast platform and enter it in your encoder.
They can follow these steps:
- Login to the Dacast platform
- Navigate to “Settings” > “Integrations” > “Encoder Keys”
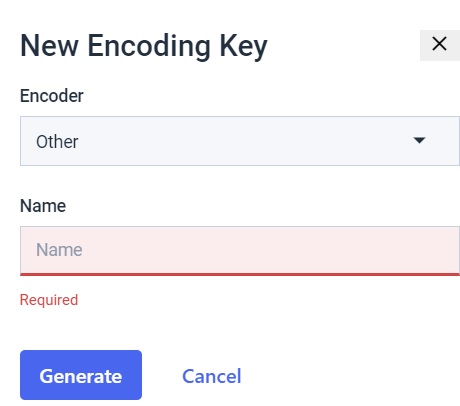
- If there isn’t already a key listed for the desired encoder, click “New Encoding Key” > “Other”
- Put the appropriate name and click the “Regenerate” button


- Enter the key into the encoder

- Allow the user to select which of the channels in their account they wish to use.
Assuming your encoder configures itself to match one of our supported live encoder configurations, the user is ready to stream using the Dacast platform.
Any questions or need help/access to this feature? Please contact us.
Not yet a Dacast user, and interested in trying Dacast risk-free for 14 days? Sign up today to get started.
Additional Resources
- Introduction to Live Streaming: A Walkthrough
- What is Video Encoding?
- Software vs. Hardware Live Streaming Encoders
- How to Use Wirecast for Live Event Streaming
- Is Wirecast (or Another Encoder) Necessary to Use the AAC Stream Format?
- Wirecast: What to Do When You Get an Error Publishing Stream
- How To Use Wirecast Encoder For Live Event Streaming
- Multi-Bitrate Streaming with vMix and Wirecast: What You Need to Know
- How Do I Broadcast My Screen With Microphone Audio on Wirecast?
- Spanish Tutorial: How Do I Broadcast My Screen With Microphone Audio On Wirecast?
- How to Use Wirecast and OBS Studio with Multiple Video Sources
- Wirecast: What to Do When You Get an Error Publishing Stream
- Introduction to Live Streaming: A Walkthrough
- New Transcoding Limits on VOD
- Transcoding: Everything You Need to Know
- VOD Multi-Bitrate Walkthrough
- Video Streaming Software and Multi-Bitrate Streaming
 Stream
 Connect
 Manage
 Measure
 Events
 Business
 Organizations
 Entertainment and Media
 API
API Tools
Tools Learning Center
 Support
 Support Articles