One of the most valuable features of Dacast is a highly effective video security toolbox. The platform is equipped with several features that allow you to keep your content out of the wrong hands. Some of these features include:
- SSL video streaming
- AES video encryption
- Geo-restrictions
- Dynamic token security
In this guide, we will give you a little background on each of these security measures and walk you through the steps to set up password protection, content scheduling, geo-restrictions and domain groups.
Dacast Security Features
Before we get into the step-by-step walkthrough of setting up your Dacast security preferences, we’re going to discuss some of the video security features offered by Dacast. You will notice later in the post that we don’t provide set up instructions for a few of these features. That’s because some of these features are automatic and require no action from you.
Password Protection
Password protection is a video security feature that serves as the first line of defense against unauthorized viewers. As the name indicates, video password protection allows you to require share videos privately by asking for credentials for access to a piece of content.
Content Scheduling
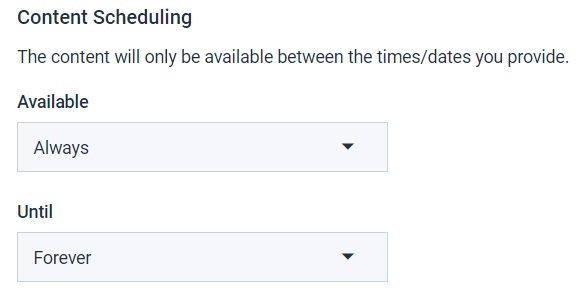
Content scheduling allows you to choose the appropriate date and time that your content will start. You can choose an end date for your content’s lifespan or you can set it to last forever.
SSL Video Streaming
Dacast uses SSL video streaming to keep all of our users’ content safe and secure. SSL, which stands for “secure sockets layer,” is an advanced security protocol that is major in the world of cybersecurity. Essentially, it encrypts all data between the server and the viewer’s device. Sites with an SSL certificate are often viewed as more credible and trustworthy to users.
Referrer and Geo-Restrictions
Referrer and geo-restrictions allow you to limit who has access based on different factors. Referrer restrictions limit access based on the domain that referred the viewer. For example, if you only want users to access your content from the domain “dacast.com,” you can enable that preference. Geo-restrictions allow you to limit access based on a physical location. If you only want viewers from a select few countries to access your content, you can set up those preferences, as well.
Setting up Dacast Security Preferences
Now that you’re familiar with some of the security features of Dacast, it is time to set up your own video security preferences.
1. Login to your Dacast account.
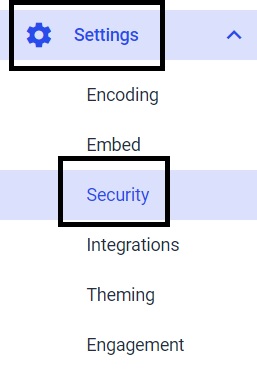
2. Click the “Settings” then “Security.”

3. Configure password protection. This is “Off” by default, but you can turn it on to activate this feature.
4. Configure content scheduling. By default, the availability is set from “Always” until “Forever.” Use the dropdown menus to set the schedule for your content.
 For Geo-Restrictions, Dacast uses MaxMind, especially their GeoIP2 databases and web services, to provide geographic restrictions to your content. This is the most accurate geolocation tool because it uses the IP of the viewers to detect their country of origin.
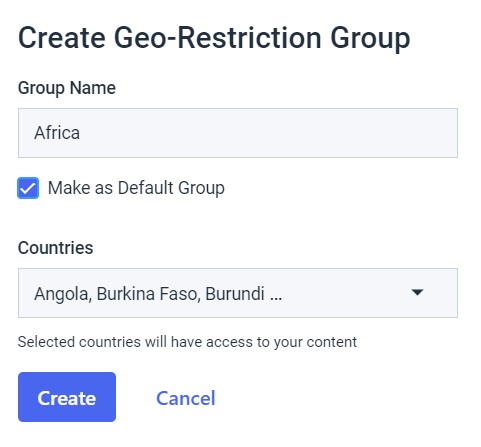
5. By default, the geo-restriction feature is set to “All Countries.” You can create a new group of approved countries by clicking the “Add Group” button.
 Clicking “Add Group” will bring up the following pop-up window:
6. Enter a title for your Group and select countries within the countries list.
7. If you want, you can set one of your “Countries Group” as a default group by checking the box next to “Make as Default Group.” Click “Create” once you’ve finished adding the preferred countries.
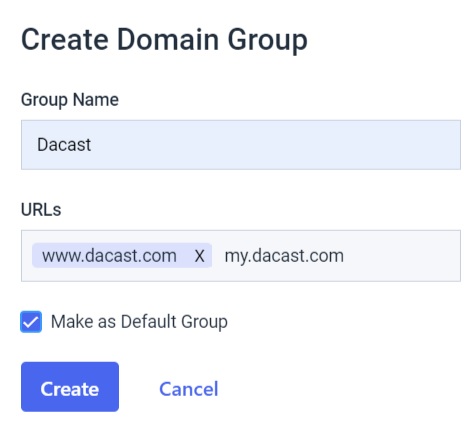
8. Use domain control to restrict access to your content by choosing where your streams can be embedded. By default, it is set to “All Referrers,” but you can create a new group of approved websites by clicking on the “Add Group” button.
 When you click “Add Group,” the following pop-up window will appear.
9. Name your group and complete your Referrers List by manually adding URLs.
10. You can set one of your “Domain Group” as a default group by checking the “Make as Default Group” box.
11. Please click “Create” once your info has been entered.
 Note: These global settings can be overridden under the security tab of any specific piece of content.
Additional Resources
- How Does Dacast Do Country Restrictions?
- Dacast Compatible and Customizable All-Device Video Player
- How to Embed Live Streaming Video on Your Website
 Stream
 Connect
 Manage
 Measure
 Events
 Business
 Organizations
 Entertainment and Media
 API
API Tools
Tools Learning Center
 Support
 Support Articles