Wirecast 8 Video Tutorial for Broadcasting Live to Akamai Network via Dacast
*Note to our readers: this article has been updated to reflect Wirecast version 8.
In this Wirecast tutorial video, we’ll cover broadcasting with Wirecast, as well as how to connect it to the Dacast service.
To start streaming you will need a computer, an internet connection, a Dacast account, and to have created a Dacast channel. Follow our steps for “Encoder Setup” and then use the encoder – that’s your live broadcast software – you prefer.
Now let’s get started with our Wirecast tutorial (with Wirecast 8) for broadcasting, beginning with a video tutorial (below).
Getting Started: Wirecast Tutorial
First, launch Wirecast. You can download a free trial if you’re not sure if it’s the right fit for you, and pay for the full service later. Note that a watermark of the Wirecast logo will appear on your stream in the free trial.
At the top edge of the window, click the ‘Gears’ icon, this will open broadcaster settings. It is next to the “Stream” and “Record” buttons.
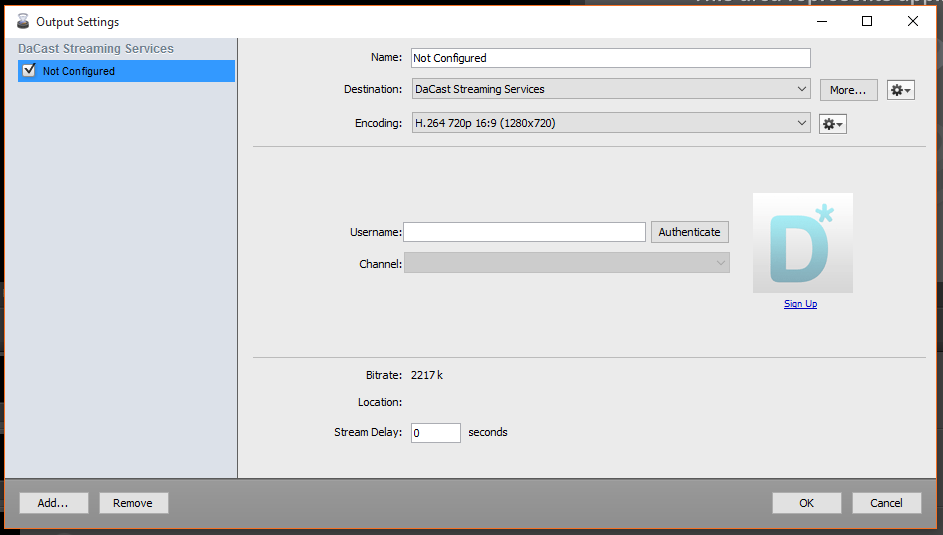
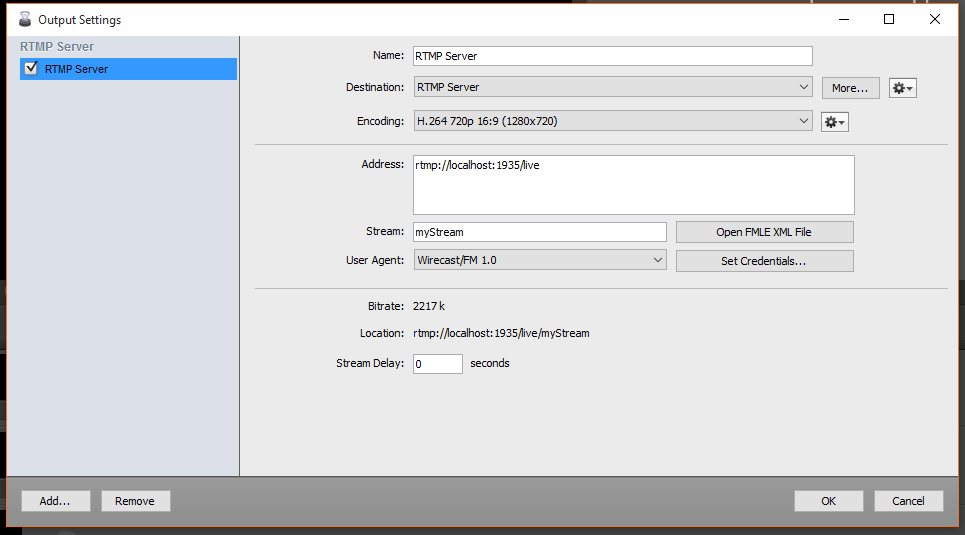
This action will prompt you to choose your broadcasting option. There are two ways to broadcast to Dacast with Wirecast. You can either use the “Dacast Streaming Services” option in the drop-down menu or select “RTMP Server”.
Wirecast Tutorial #1: “Dacast Streaming Services”
This is the easiest option to use. Simply log in as you would on the Dacast website. Fill in your email address, click “Authenticate” and fill in your password.


This will log you into the Dacast service and will allow you to stream to any of the channels you have created on your Dacast account, by selecting them from the drop-down menu
Wirecast Tutorial #2: “RTMP Server”
RTMP stands for Real-Time Messaging Protocol. Here at Dacast we provide you with a streamline service, for the actual hosting of servers we use Akamai Technologies.


The only reason you would need to use this option is if the encoder you’re using doesn’t have a Dacast login option. Alternatively, if you are having an issue with the Dacast plugin, you can try using the RTMP connection instead.
For this connection, go to your Dacast channel settings, and go to “Encoder Setup”. Select “Other RTMP Encoder”. This will display the following four pieces of information you will need:
- Login
- Password
- Stream URL
- Stream Name
Make a note of these by copying and pasting them to a Notepad or Word file.
After selecting the “RTMP Server” option. Under “Address” fill in your Stream URL and in “Stream” fill in your Stream Name.
Then click “Set Credentials”. This will prompt you to fill in your login and Password.
Click okay and now you’re connected to Dacast with Wirecast
Adding Cameras and Sources


Now that you’ve set up your encoder connection, it’s time to have something to broadcast!
Click on the “+” sign next to one of your blank shots to add a visual source. You can choose a video device, monitor source, still image or audio sources.
To add a web camera, click the little camera icon that appears when you hover over it and then select the webcam you want. If you cannot see the webcam you are looking for, trying clicking “Show Sources Settings…” and see if you can find your video camera device there.
Now press the ‘Arrow’ to transition your video feed from the Preview area to your live Broadcast. Hit “Stream” and you’re off on your first live stream. We recommend testing it your stream a few times to make sure everything is working the way you want to.
Conclusion
What tutorial would you like to see next? Do you have feedback about the content or format of this Wirecast tutorial? If do you have questions or feedback, feel free to leave them in the comments below, and we’ll get back to you as soon as we can. For exclusive offers and regular live streaming tips, you can also join our LinkedIn group.
Not yet streaming with Dacast? If you’re ready to give the Dacast platform a try, why not take advantage of our 14-day free trial (no credit card required)? That way, you can test all our great features for yourself! Just click the button below to sign up today.
Thanks for reading, and good luck with your live broadcasts!
Video and article by Eliot Miller.

 Connect
 Events
 Business
 Organizations
 Entertainment and Media
 API
API Tools
Tools Learning Center
 Support
 Support Articles
