Stream Live Video from iPhone and iPad: Broadcast Me
Looking to stream live video from iPhone or iPad devices? Using the app Broadcast Me, you can stream live video using an RTMP iOS compatible streaming solution like Dacast. This app lets you use your iOS device to stream live videos to your website, Facebook page, and more.
This article will help you learn how to stream with your iPad, and how to stream from your iPad. The process, when using a streaming solution like Dacast with the app Broadcast Me, is straightforward.
Basics
This blog will act as a guide to broadcasting live video streams using the app Broadcast Me with your iPad to your website and other applications. This is fairly quick to do if you are familiar with live streaming, but we’ll take it slow. The steps we’ll cover here include:
- Basics
- Initial Broadcast Me Setup
- Your Channel: Dacast Account
- Necessary Dacast Channel Information
- Streaming with Broadcast Me
In order to use this guide, you’ll need three things:
1. iPhone or iPad
2. The Broadcast Me app
3. A Dacast account
With these three things, you will learn how to use your iPad to stream live video.
Note: There is an Android version of the Broadcast Me app as well. However, presently it does not work with Dacast, Broadcast Me is working on it.
According to the new Broadcast Me pricing policy and terms, please note that BroadcastMe now offers unlimited streaming. This access entails a free download, with in-app purchases then a fixed payment that offers lifetime access.
Please note also that this price is for United States customers. Pricing in other countries may vary and actual charges may be converted to your local currency depending on the country of residence.
Initial Broadcast Me Setup
Your first step to stream live video is to download the Broadcast Me app on the device you want to use.
You can download the app here. After installing it, launch the app and click on “Start Live Streaming” at the bottom. You can use Broadcast Me with your iPad or even your iPhone for live streaming.
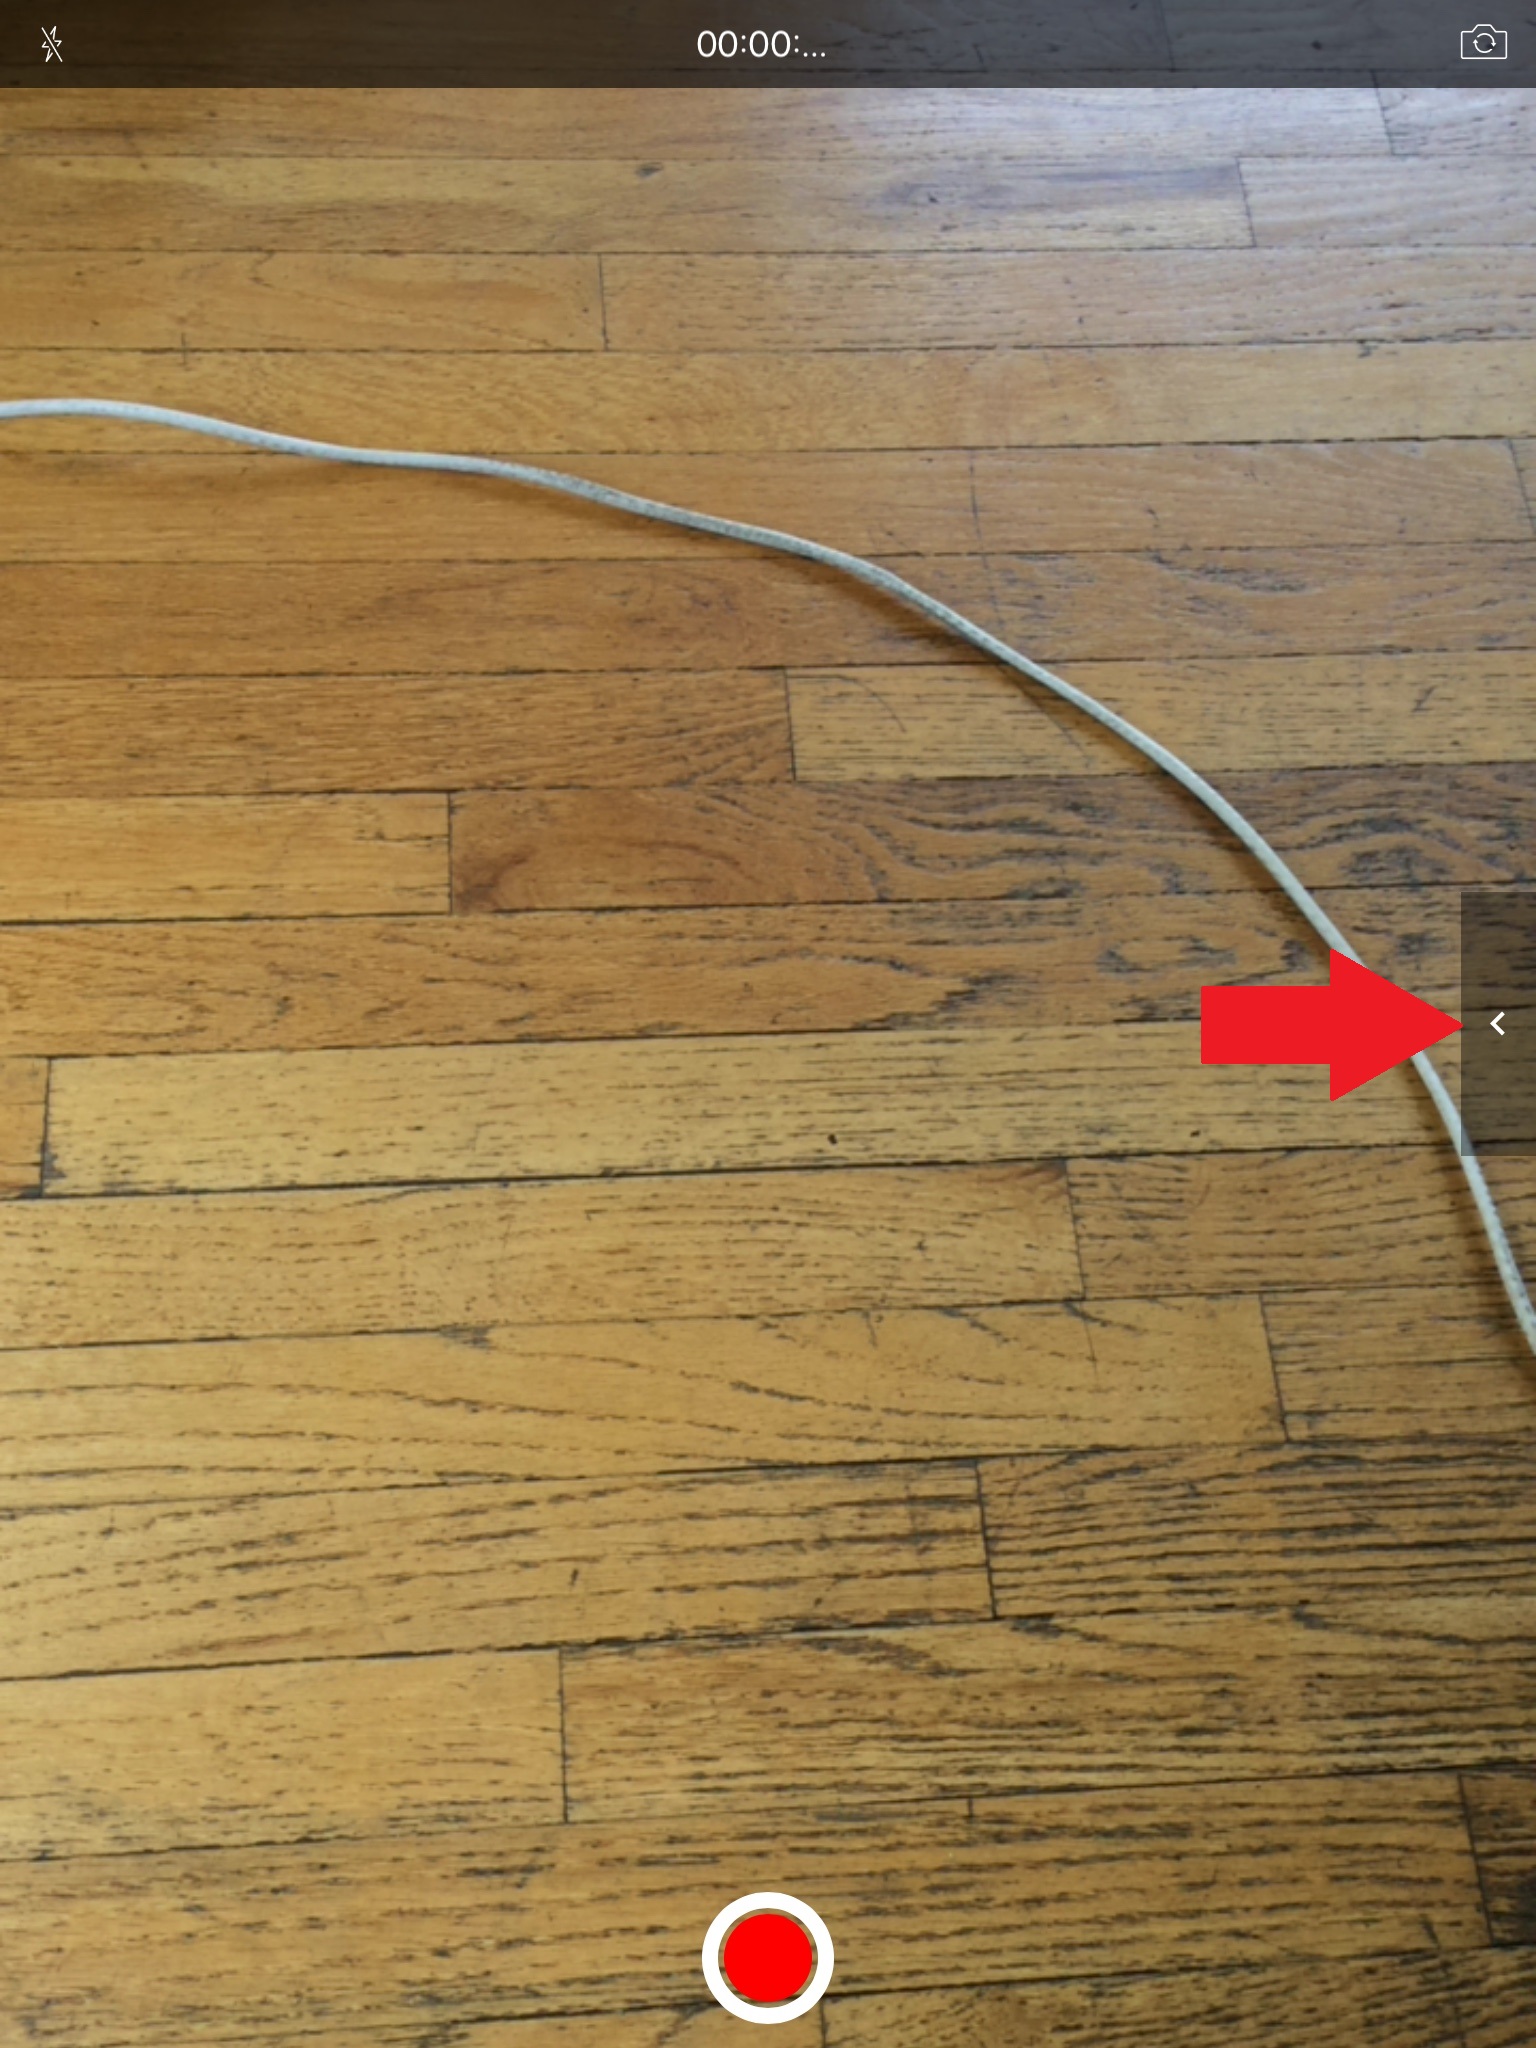
Below is a preview of what Broadcast Me looks like (screenshot from an iPad Mini).
Please start by displaying the right-side menu as shown below:
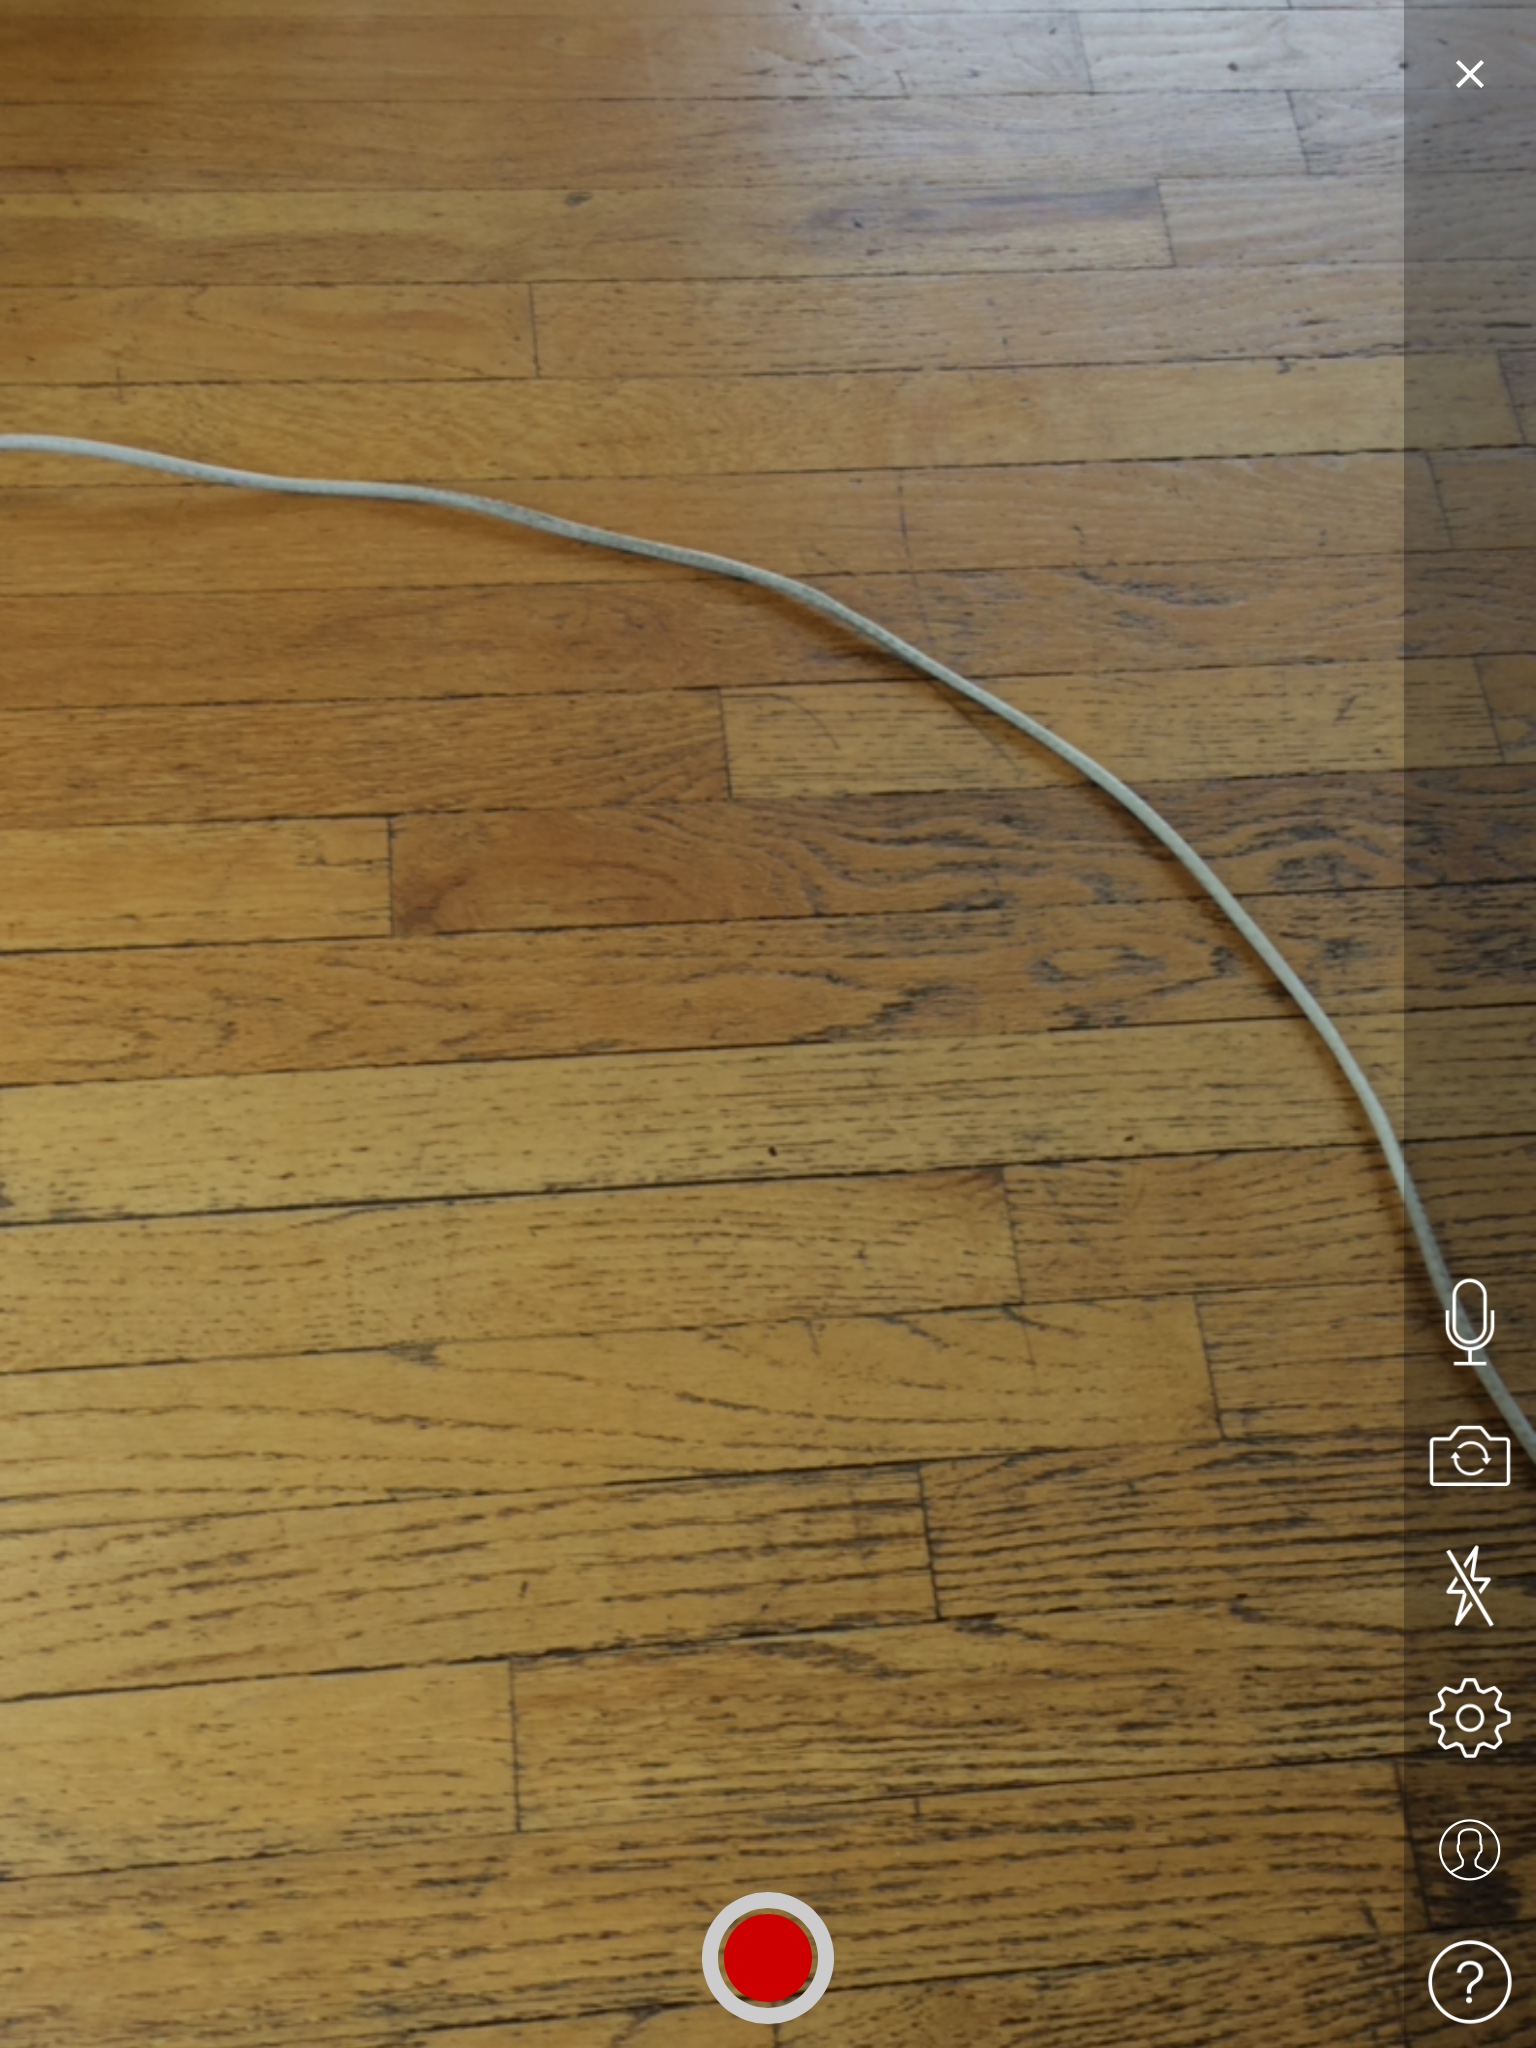
You now see six icons on the right-hand side:
- The first is the ability to mute.
- The second is to change the camera (i.e. use the front or back camera).
- The third controls lighting.
- The fourth is to set up your stream.
- The fifth is to log in to your Broadcast Me account (if you have one).
- The sixth one is the Help section.
To set up your stream, please click on the gear icon ![]() .
.
This will launch a setup screen as shown below.
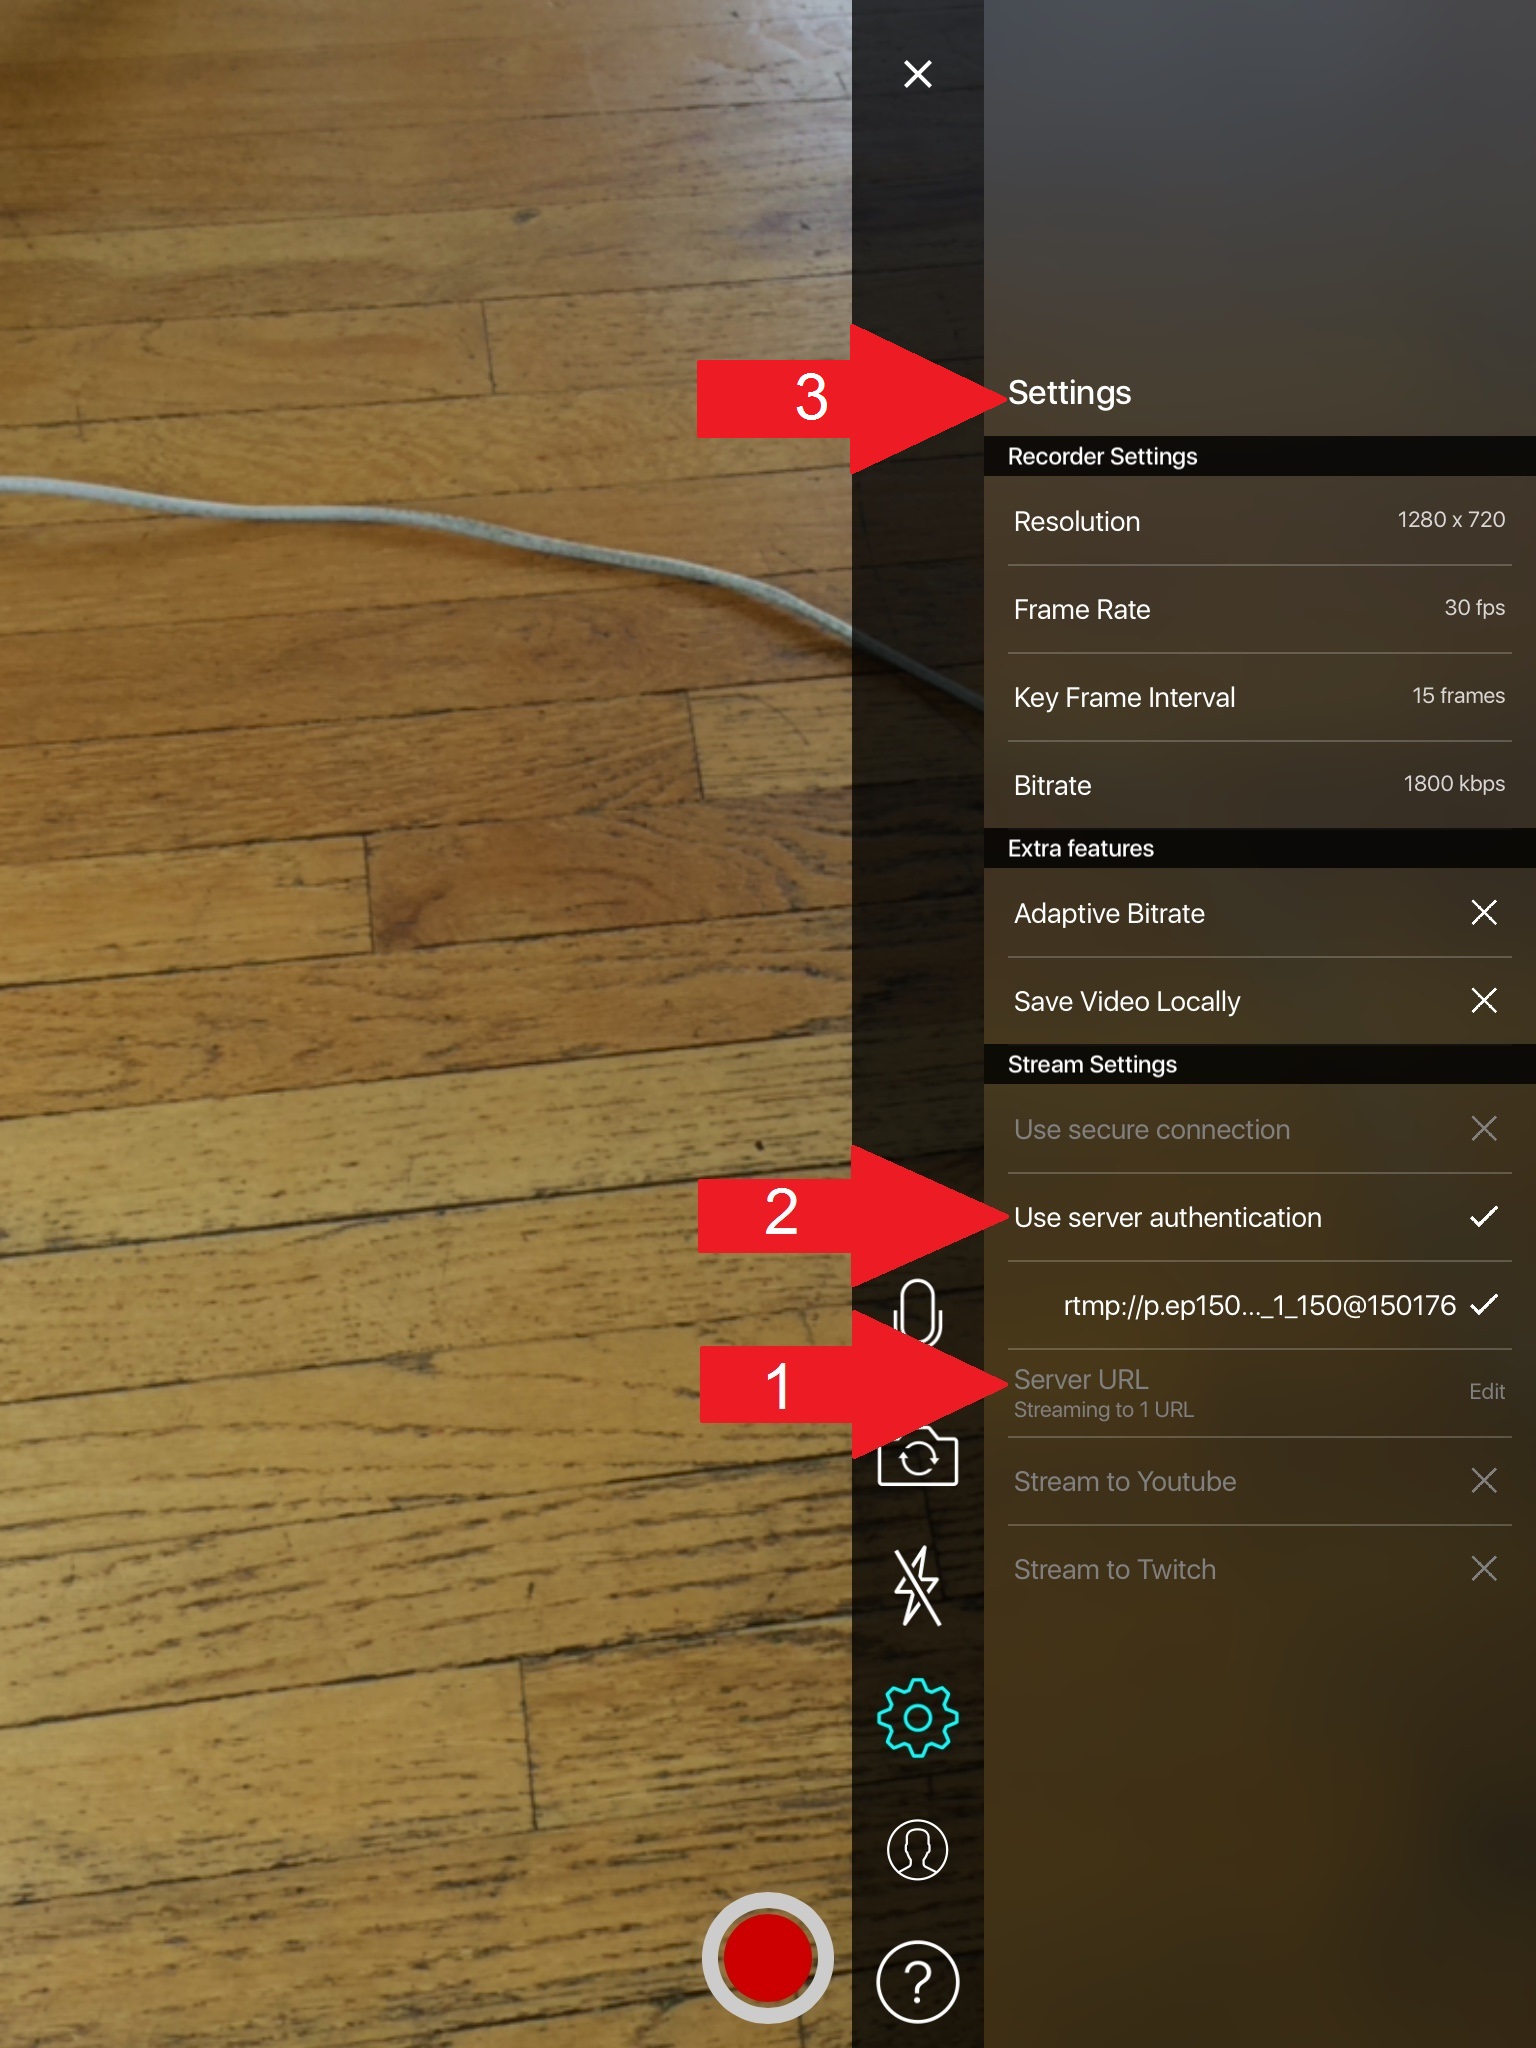
There are 3 remaining steps at this point that you need to do in order Dacast channel with your Broadcast Me app.
For the first 2 steps, you need to sign in to your Dacast account to get your channel information. Once you’ve signed in, you can proceed to the next section and continue to learn how to stream with an iPad.
Your Channel: Dacast Account
Now you need to get the necessary information from your Dacast live channel.
The easiest way is to connect to your Dacast account from the same mobile device from which you plan to stream live video. This way, you can easily copy-paste your Dacast information with your iPad or iPhone.
If you haven’t already, create a live channel within your Dacast account.
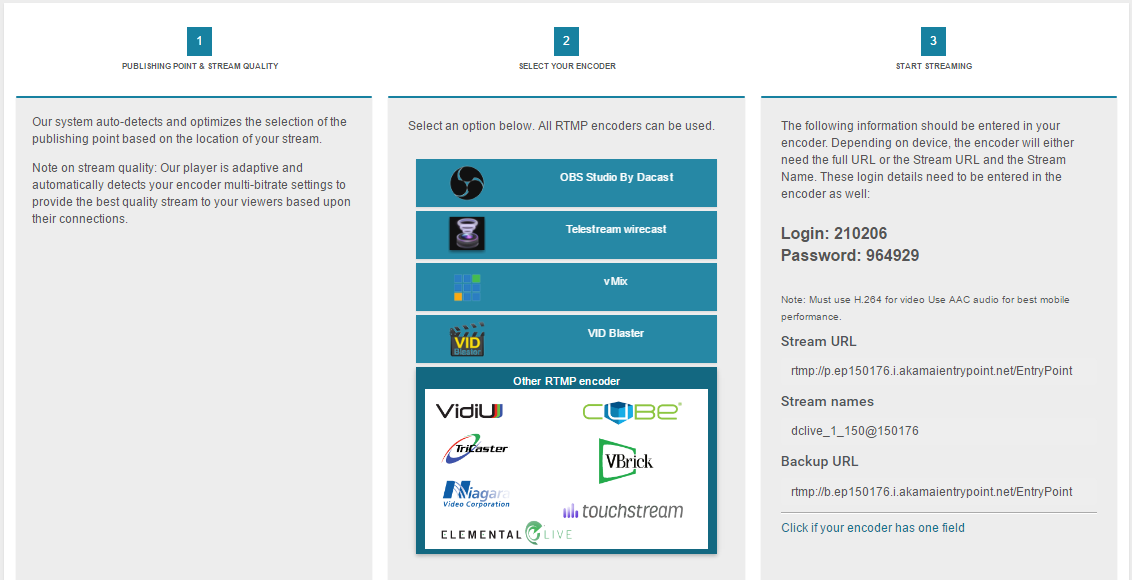
Now navigate to ENCODER SETUP. This is a three-step process. Note that the bitrate and resolution entered in the first step (shown below) will be ignored in this instance. So that field can be left at the default values or synced with what you plan to do in the app.
In terms of an encoder, select “Other RTMP Encoder“. Once you have fully filled out all fields you should see this:
Necessary Dacast Channel Information
The Broadcast Me app requires three things from your Dacast account.
- URL
- Username
- Password
All of this information is located in the third panel of the ENCODER SETUP.
The username and password are found in bold on this page under the headings “Login” and “Password“.
These are both a series of numbers that are unique to each channel. These are not the email and password you use to login to your Dacast account.
Below is an example:

Next up, you need the URL. Locate it under the third column toward the bottom.
You need a single URL, so click where it says “Click if your encoder has one field” as shown below.
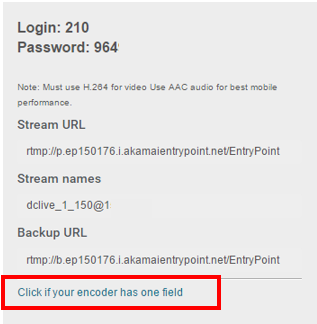
This will produce one, long field called the “Full URL.” You need to enter this “Full URL” in the URL area of Broadcast Me.
Unless you copy-paste, it will be a slow process to manually enter it (I speak from experience here!).
Stream Live Video with Broadcast Me
Now it’s time to get set up to stream live video with Broadcast Me using your iPad to stream live video! We’ll walk you through the next three steps one by one.
#1 Enter the Server URL
Click on “Edit” to edit your server URL and paste the full URL you’ve just copied from your Dacast account: 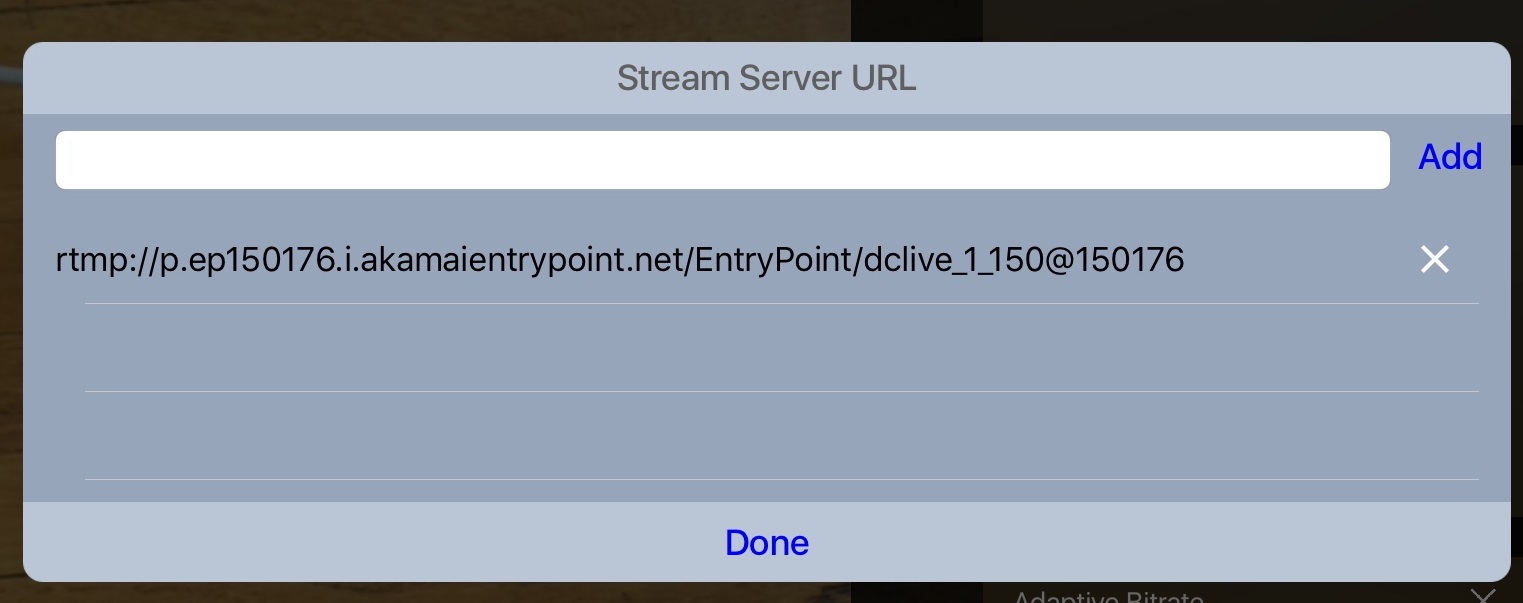
Once you’ve entered your server URL, please click ADD to add it to the list of Server URLs. You can remove any unnecessary Server URL from the list by clicking on the cross next to it. When you are satisfied with your server URL(s), click DONE.
#2 Use server authentication
Please enter your login in the Username field and your password in the Password field. 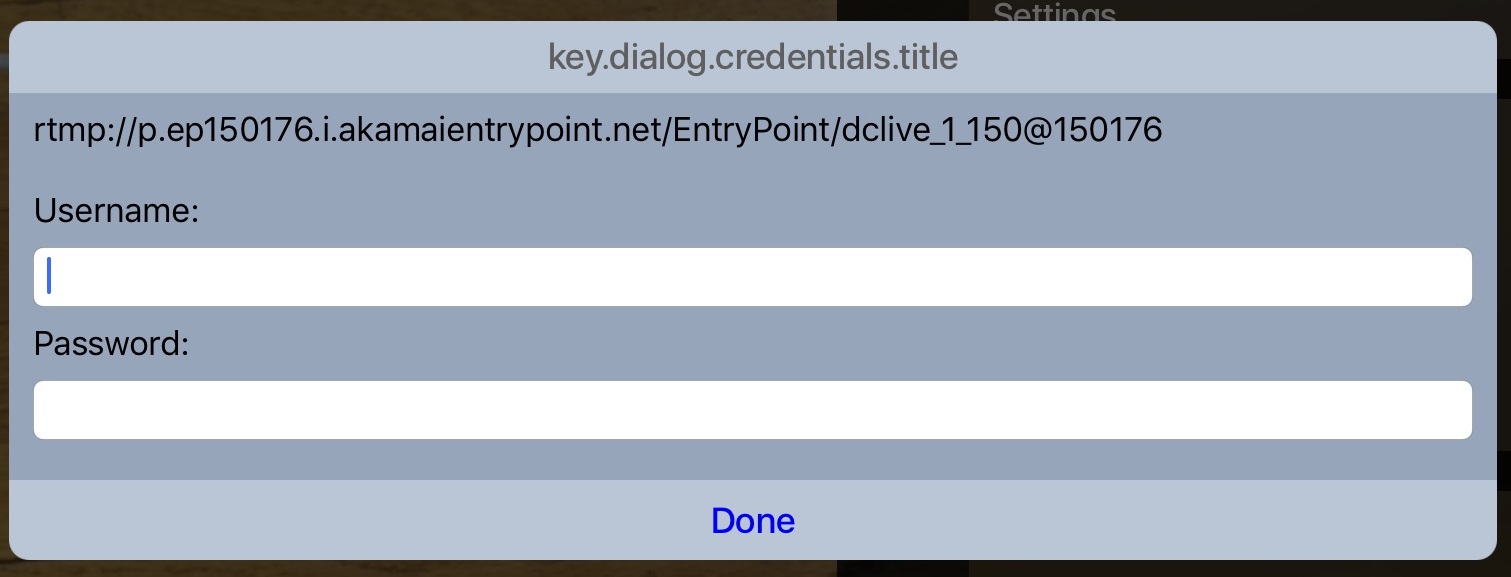 Once you’ve done so, please click DONE.
#3 Configure your streaming settings
You’re nearly there! The final step to prepare to stream live video involves configuring your settings. Before the fun begins, you need to configure the bitrate and the resolution at which you want to stream.
a) The resolution depends on your preference (and your audience), although 480p or 720p is typically ideal.
You can click on the Resolution field and select the one you want.
b) The bitrate is important, and you do need to change it. By default, it’s set to broadcast at 1.8 MB per second. For most upload speeds, this default bitrate is too high. The majority of broadcasters need to change the quality to something between 350kbps to 750kbps.
To best evaluate at what rate you can realistically stream, go to Testmy.net. Use the device you plan to stream with and do an upload speed test. Aim for a bitrate that is half or less than half of your upload speed.
For example, if your upload speed is 800kbps, stream at 400kbps. You will need to factor in other elements as well. These include the distance from your router and whether you use a shared network. Plan to do some tests to gather enough results. If you experience freezing in the feed, this means the bitrate is too high.
Once you’ve trialed your streaming speed, click on the field “Bitrate” and enter the video bitrate you want in kbps.
After completing the 3 above steps, you’re ready to begin, you’re ready to begin using your iPad to stream live video!
Just click the red button at the bottom of your screen and your stream will begin! After approximately 40 seconds, you should be able to see your stream using your share code.
That’s it; you can now stream live video from your iPhone or iPad! As you can see, learning how to stream with iPad is simple!
Conclusion
You’ve done it! You’re now broadcasting directly from your device. At this point, you have several options if you’re new to using your Dacast account. If you haven’t already embedded the live stream, check out this Dacast article on how to embed videos to your website. It walks you through a detailed approach to adding a channel to your website.
If you have any feedback, including any tips and tricks you discover while using Broadcast Me, feel free to mention them in the comment section. We’ll be happy to field them! We’ll integrate any particularly juicy tips into this article or a future edition. For exclusive offers and regular live streaming tips, join our LinkedIn group.
Finally, if you happened across this article and haven’t tried any video streaming platforms, why not give Dacast a try? We offer a top-quality, global live streaming CDN and high-end features at affordable rates. With our 14-day free trial (no credit card required), you can test out all the great Dacast features for yourself!
Thanks for reading, and good luck with your streams!
 Stream
 Connect
 Manage
 Measure
 Events
 Business
 Organizations
 Entertainment and Media
 API
API Tools
Tools Learning Center
 Support
 Support Articles