How to use Flash Media Live Encoder
In this video tutorial, we’re going to cover how to use Flash Media Live Encoder (FMLE). We’ll take a look at how to set up video and connect to the Dacast service.
Flash Media Live Encoder (FMLE) is free to use encoding software that will allow you to broadcast live video over the internet. It is basic, but also very easy to learn. FMLE launches quickly too and is generally a great tool for trying out your broadcast and testing that everything works.
Setting up Video
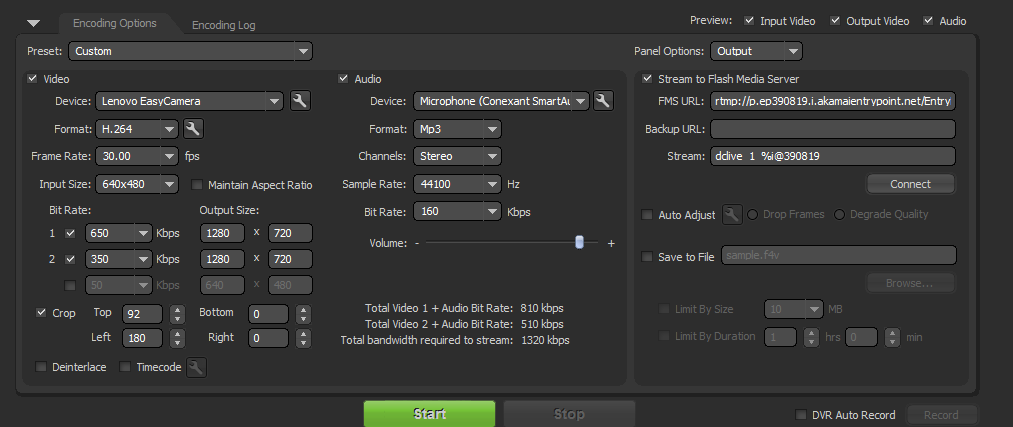
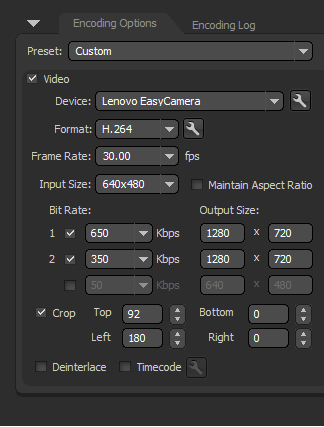
In FMLE we can only have one video input. There is no Monitor or Screen Capture functionality in FMLE, and neither can we use multiple camera sources. FMLE is really intended for use with one web camera plugged into your computer.
Under “Device:” select the video device you want, from the drop-down menu.
For “Format:” we want “H.264”. The “Frame Rate” can remain at 30. Under “Input Size” we can select the resolution of the camera we are using. For instance, a 1080p camera has a resolution of 1920×1080.
We can also “Crop” the video if we want to. This will not leave an empty blank space in the broadcast, but instead, reduce the size of the video. This can be useful if we cannot move the camera but want to cut something out of the shot.
For your live stream bit-rate, the default 650 kbp/s is fine. We can lower this value to around 350 kbp/s if our internet connection is struggling with the broadcast, or we can increase it to 1000 kbp/s for higher quality streaming.
For multi-bitrate streaming, select the number extra bit-rates you want. Remember, your connection will have to be able to support all the bit-rates you are streaming at, on top of Audio. Also, check that the resolution matches up the resolution of your source.
FMLE will tell you the total bandwidth needed to support your broadcast. Use a website like test.my to see if you have a strong enough internet connection for your current bit-rate
Setting up Audio
In FMLE’s audio options we can select the audio input we want under “Device:”
In “Format:” options sadly we can only choose MP3 as our Audio codec. Generally, we recommend the audio codec AAC, which is notably more versatile when broadcasting to mobile devices.
Naturally, we want to have a “Stereo” sound. A “Sample Rate” of 44100 Hz is fine. For our bit-rate however, we may want to increase it to 192 kbp/s if our internet connection can support it.
Again, check your “Total Bandwidth” is under what your internet connection is capable of uploading.
Setting up your Connection
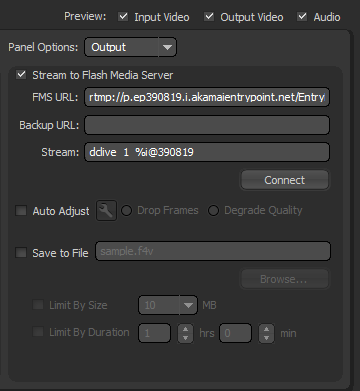
To connect Flash Media Live Encoder to the Dacast service, login to your Dacast account. Go to the Channel you want to connect, and go to “Encoder Setup”.
Select the Server closet to your location, and make check that the Resolution and the settings for your Multi-Bitrate streaming (if you are steaming multiple bit-rates) match up.
You will be prompted to fill in your “Username” and “Password” from the “Encoder Setup” page then click “Connect”.
Your Flash Media Live Encoder is now connected to your Dacast Channel!
Click the green “Start” at the bottom and you’ll begin your broadcast.
As one final step, before you start broadcasting, you can select “Save to File”. This will record your broadcast onto your computer, which will allow you to upload it to our VOD service. It will also mean that there is a “hard” copy backup of your broadcast, should your internet connection struggle during your stream.
We hope this tutorial for Flash Media Live Encoder has been useful to you.
If you have any outstanding questions or suggestions for future tutorials, feel free to leave them in the comments.
Article and video by Eliot Miller. Find me on Twitter and G+


