


How to Live Stream Video on eLearning Website

Are you wondering how to stream live video on the eLearning website for online education? If so, you’ve come to the right place! This blog article covers how to live stream video on the eLearning website for those new to this topic. We’ll review both the broad context for this industry trend, as well as the steps to successfully live stream video on the eLearning website.
For context, Cisco research has shown that two-thirds of teachers agree that video education helps students to learn. This data on educational live streaming solutions likely comes as no surprise. Live streaming brings an immediacy to educational video that makes it even more effective than VOD (video on demand) content.
In this article, we’ll first review how and why to stream live video for your educational work. Then, we’ll discuss some of the key features that educators need to live stream video on the eLearning website. Finally, we’ll address some technical specifics you’ll need to get started: software, cameras, and online video platforms.
Let’s get right to it!
Why live stream video on the eLearning website?
As we’ve mentioned above, online video education is highly effective for engaging students and conveying new information. Today, the eLearning trend is increasingly recognized throughout the education industry.
 Let’s assume you’re ready to live stream video on the eLearning website or for another educational context. However, you don’t know how or where to start. What’s your next step?
First, it’s important to understand how live video is effective for education. In 2016, the eLearning Industry blog ran an article on how live streaming is changing the future of learning. In that piece, among others, the company highlights 8 factors that are driving increased adoption of live streaming in education.
8 Key Factors for Live Streaming in Education:
- The methodology of teaching (flipped classroom model and beyond)
- Performance metrics (new testing and interactive tools)
- Cost reductions (dramatically reducing the costs of education for students)
- Interactivity (expanding beyond the “raise your hand” tradition)
- Collaboration (breaking down the distance boundary)
- Accessibility (ability to demonstrate skills to a wider audience)
- Diversity (both in terms of demographics and subject matter)
- Mobile learning (key for the future, as more people own only smartphones)
In a 2018 article, the eLearning Industry published a related article on the difference between mobile learning and eLearning for education. If you’re new to this topic, you might also review the applications for eLearning websites in general.
Comparing monetization and privacy features
With the above context in mind, let’s turn to some key features specific to live education broadcasting. Of course, online educators have many different needs for live stream video technology. However, many share a need for two features in particular: monetization and privacy.
Privacy settings
Unless you intend to release all your material to the public for free, you want to keep your videos private for students enrolled in your programs. You can create this digital security via password protections, subscription-access, private landing pages, and more.
Monetization options
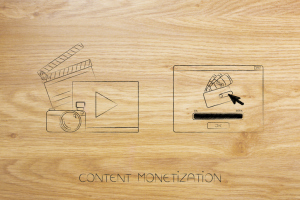 Monetization is also important for online educators working as freelancers or selling access on a course-by-course basis. There are three main ways to monetize online educational videos. First, you can charge for access to each video or collection of videos. This describes the “pay-per-view” (PPV) approach. Second, you can charge a weekly, monthly, or yearly fee for access to a library of existing and new content. This option constitutes a subscription model. Finally, you can monetize via advertising, by using page-views to drive your revenue.
Each of these monetization approaches entails pros and cons. With a professional OVP like Dacast, you’re guaranteed access to all three options, as well as a variety of security options to live stream video on the eLearning website. The bottom line? Solid video streaming solutions should provide monetization and privacy features–and much more!
Choosing an OVP to live stream video on the eLearning website
In 2016, 52 percent of universities surveyed used a video streaming service, or online video platform (OVP). At Dacast, we think of these services as the “Swiss Army Knives” for online video. In other words, OVPs provide a variety of useful tools and configuration options for publishing online and live video.
 For educational broadcasting, you should look for an OVP that supports robust monetization options. You’ll also want to compare streaming solutions, like Dacast, that offer flexible content control and security tools. Additionally, you’ll want to choose a platform that delivers live streams reliably via a top-tier CDN (content delivery network).
Of course, to live stream video on the eLearning website successfully, you need a platform that fits your budget. If you’re new to the Dacast platform, you can read more about our affordable live streaming pricing plans.
Testing internet connection and bandwidth
Once you select a video streaming solution, you’re ready to consider internet and bandwidth requirements. To live stream video on the eLearning website at good quality, we recommend an upload speed of no less than about 3-4 Mbps. If you plan to live stream in HD, you’ll need more speed than that.
We also recommend the following:


use a wired Ethernet (when available) instead of WiFi. This increases connection speed and reliability.
- test your internet before attempting to live stream. This ensures that it’s fast enough to deliver your stream at the desired quality.
- understand that internet speeds are measured in two ways: upload speed, and download speed. Upload speed is the more important measure for live stream video broadcasters.
However, don’t get too bogged down in internet connection and bandwidth minutia. Today, internet speeds are generally increasing; 4G LTE can deliver high-speed internet across much of the country. In 2019, having sufficient bandwidth for live stream video is easier than ever before!
Assembling equipment to live stream video on eLearning website
 Simple live video streaming is easy. You just need a laptop, a smartphone, or a tablet with an integrated webcam and microphone, which are standard these days. Beyond your device, you’ll need (at the minimum) free encoding software, like OBS Studio, or mobile apps.
However, if you want to do higher-quality streaming, you’ll likely need an external camera and microphone. In that case, see below for what’s involved to live stream video on the eLearning website.
Equipment needs and setup:
- The camera itself (look for a 1080p+ resolution camera with HDMI or SDI output)
- An HDMI or SDI cable (to carry the video signal from the camera)
- If you’re using a computer with a software encoder, you’ll need:
- A capture card or device (transforms the input into a format your computer can access)
- A cable to connect this capture device to the computer (if necessary)
- The computer itself (something moderately powerful)
- The software encoder (such as OBS Studio, Wirecast, vMix, or VidBlasterX)
- If you’re using a hardware encoder, you won’t need the above. Your camera will generally plug directly into the encoder device via HDMI or SDI.
- An external microphone will provide better audio quality if you don’t use the built-in mic on your video camera. The external mic may plug directly into your camera. Alternatively, you can connect the audio source to your computer or hardware encoder via a separate cabling arrangement. If you’re using a computer, choosing a USB microphone is the simplest option.
Preparing your camera and recording gear
Once you’ve purchased all the necessary equipment, it’s time for setup.
 First, we recommend showing up very early for any event or presentation. That way, you’ll have plenty of time to set up and to troubleshoot any issues that arise. Even the most prepared and experienced broadcasters have to contend with unexpected technical, logistical, or related problems from time to time.
Here’s the process we recommend for setting up your live video streaming equipment:
- Choose a central location for your encoder or computer, and set it up on a table.
- Run cables to your video camera(s), and position them at the appropriate locations to capture a good view.
- Connect microphones to cameras, or directly to the computer/encoder.
- Turn everything on. If you experience any connection problems, make sure that cameras/capture devices are powered on, and then connected to the computer/encoder.
- Setup your encoder software, and begin test streaming.
- When you are satisfied, begin your live stream!
Setting up an encoder to live stream video
As mentioned above, software or hardware encoder is a crucial component of your live educational broadcasting. First, we recommend reading up on live streaming encoding software if you’re new to this technology. You can also search our many related blog articles on both software and hardware encoders.
 To live stream video on the eLearning website, you first need to configure your encoder. Generally, this first means connecting the encoder to your chosen OVP (i.e., Dacast).
Next, you’ll need to select the output settings you want.
We recommend that you consider streaming in multiple bitrates to reach as large an audience as possible. We also recommend that the sum total of all your bitrates does not exceed (roughly) 50% of your internet upload speed.
Embedding a video player on your website
You’re almost ready to go live! The final step to setting up your live broadcast involves embedding the video player on your website. Once you embed the player, students and learners can view your live stream directly from your website.
Generally, you use an embed code to do so. Your streaming platform (such as Dacast) provides this code to you from within your account. Note that each embed code is unique and specific to each live stream video channel you create.
Once you have the code, you can copy-paste it into the code-editor of your website.
Click here for a more detailed guide to embedding a video player on your website.
Conclusion
Once you’ve embedded the video player on your site, you’re ready to broadcast live! In this article, we’ve provided you the information you need to live stream video on the eLearning website, and in other online educational contexts too.
Don’t hesitate to share your questions and feedback below. We love to hear from our readers, and we will get back to you.
Interested in learning more about the Dacast online video platform? You can try our 14-day free trial (no credit card required) to test out all the features for yourself. We’d love to help you get started with your live stream video education journey!
For exclusive offers and regular live streaming tips, you can also join our LinkedIn group.
As always—thanks for reading, and good luck with your live streams!
By Max Wilbert