How to Use Multi-Bitrate Streaming for On Demand Video Upload
Providing your on-demand video viewers with the best user experience should be a priority. Making sure your viewers can stream your content in the optimal quality for their internet speed is a must. Multi-bitrate streaming is a video hosting tool that allows you to do just that.
Multi-bitrate streaming allows your audience to access the right quality of content for their internet connection speeds. This way, your video can reach viewers who don’t necessarily have the strongest internet. Note: to learn more about this topic, you can also check out our article on Wirecast Pro video broadcasting software with multi-bitrate streaming.
Today, we’re going to discuss what multi-bitrate streaming entails. First, we’ll dive into how and why multi-bitrate streaming can be a good option for your viewers. We’ll provide our step-by-step instructions for multi-bitrate streaming through your Dacast account.
Let’s dive in more about how multi-bitrate streaming works!
Table of Contents
- Why Use Multi-Bitrate Streaming?
- What is Adaptive Bitrate Streaming?
- Setting up Multi-Bitrate Streaming with Dacast
- Conclusion
Why Use Multi-Bitrate Streaming?

Unless you are dealing with very small files, multi-bitrate streaming is almost a given. It has the potential to enhance each viewer’s experience, so why wouldn’t you use it?
Most content creators and professional broadcasters want viewers to watch their content in high quality. While high definition quality is ideal, it’s not always realistic since not all of your viewers have to access the internet speeds required for the highest quality streams.
With multi-bitrate streaming, you can deliver the highest quality video that a viewer’s device and an internet connection can support, helping to keep all of your viewers happy with the quality of your video content.
The more popular and widespread streaming video content has become, the more viewers have come to expect a high-quality, interruption-free streaming experience.
In recent years, studies have shown that viewers’ average tolerance for buffering has continuously declined.
According to those studies, in 2011, an average of 3 minutes of viewing time was lost for every 1% increase in buffering was 3 minutes. The following year, that figure jumped to an average viewing time loss of 8 minutes. In 2013, the same study found an average viewing time loss of 11 minutes.
The bottom line is that modern viewers don’t tolerate buffering, making multi-bitrate encoding essential for the user experience.
Multi-bitrate streaming of pre-recorded content files is quite easy since all of the tools you need are built into your Dacast account.
What is Adaptive Bitrate Streaming?

Before we move into the process of setting up multi-bitrate streaming, we’re going to take a moment to address adaptive bitrate streaming.
Adaptive bitrate streaming is a function that selects the best bitrate available based on each viewer’s individual connection speed. It does this automatically, without the viewer having to choose the best quality level for their device and internet connection, making it easier than ever to deliver the best quality video to your viewers.
For example, a broadband customer viewing with their desktop with strong internet will likely receive the 720p version. On the flip side, a viewer streaming on their iPhone via their cell service will likely receive the 240p option.
With adaptive bitrate streaming, viewers also have the option to click the gear button to change the resolution setting. However, these features are designed to provide a non-intrusive experience that requires minimal effort to experience the best quality stream.
Adaptive bitrate streaming is all about making it as easy as possible to deliver the best video experience to the viewer, with as little effort as possible on the viewer’s end to access quality content.
Setting Up Multi-Bitrate Streaming with Dacast

In order to set up multi-bitrate streaming, you must first log into your Dacast account and upload a video.
Please note that a video file must be a bitrate file above 240p in resolution in order to work with this process.
Next, you need to click on that video to select it. You’ll see a series of tabs at the top of your screen for this video. These tabs include “Description” and “Publish Settings.” Click on the “Multi-Bitrate” tab from this selection.
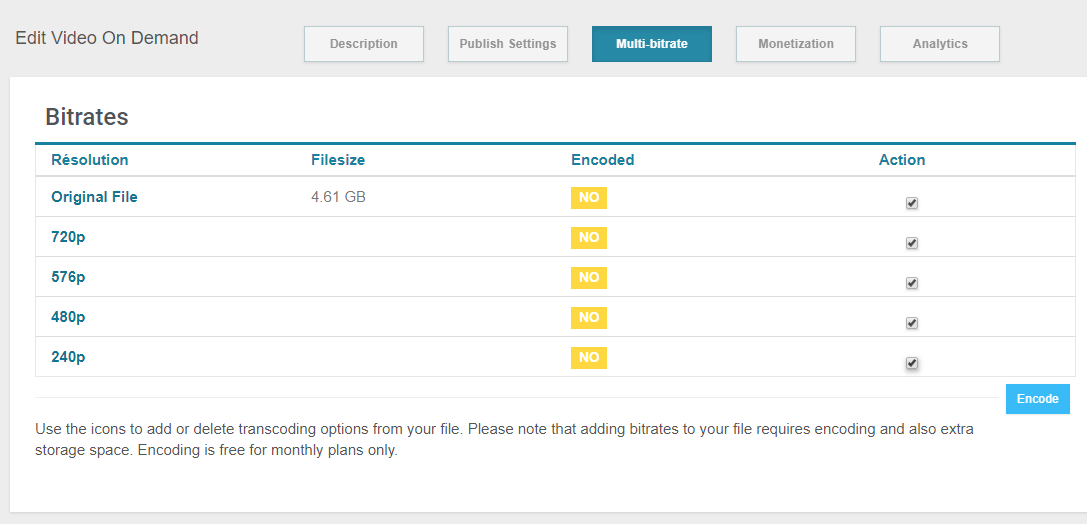
This option redirects you to a page that looks like this:

For this example, we uploaded a video file with an original resolution of 816p (1749×816). To support those viewers with slower connection speeds, however, we enabled the option for multiple bitrates depending on the viewer.
For example, for a high definition 1080p video file, you can add options for 720p, 576p, 480p and 240p resolutions. This design gives the broadcaster the flexibility to customize your file formats to your needs and goals.
You can choose to offer many bitrate options to your viewers or just one or two options. This feature is designed to ensure maximum customization options for you and your viewers.
For the best experience for your viewers, choose as many resolution options as possible.
On this page, you’ll see a list of possible resolutions (i.e. 480p). At the top of this list, you’ll see a resolution labeled “Original File.” This line denotes the resolution and bitrate of the video file that you uploaded originally.
If you are uploading a file that is not compatible (a red or yellow “Original File Name”), you then have the option to encode a compatible version at the same resolution.
Resolutions below the original will appear with a clickable box under the “Action” column. Select the resolutions you want to get and click on the “Encode” button.
This process can take some time, depending on file size. While in progress, you’ll see a “Waiting” progress bar that confirms that the system is encoding the file. It is perfectly okay to leave this page while the progress bar is in motion without slowing the encoding process.

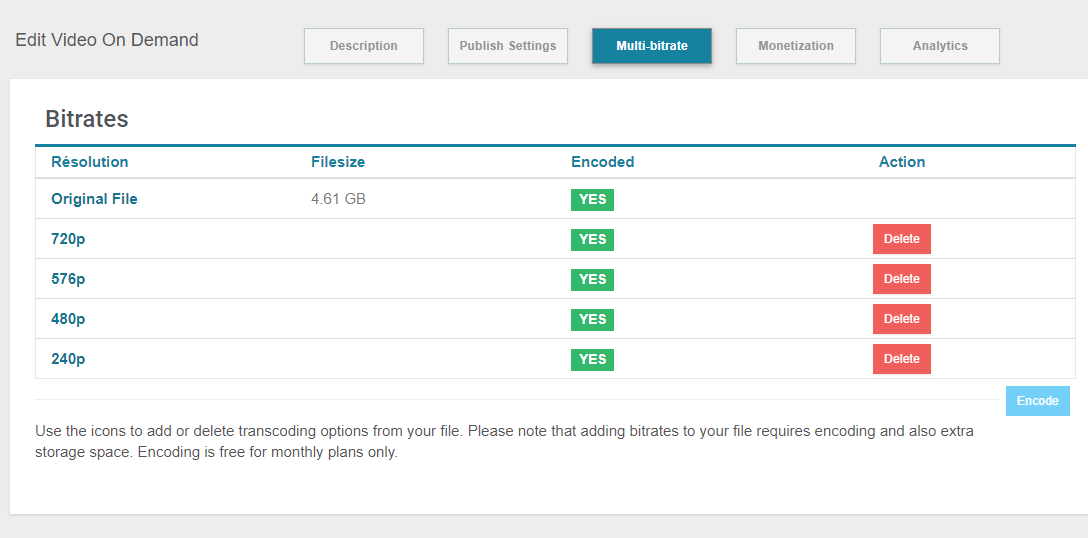
When the encoding process finishes, the files automatically appear in your Dacast profile. From there, your viewers can select the best bitrate option for them.
If you want or need to remove a bitrate option in the future, you can click the “Delete” button.
It’s also important to mention that the use of the multi-bitrate feature does increase the storage size and use your transcoding credits on your Dacast account. This is because each additional bitrate requires more storage and more transcoding credits to be encoded.
If you need to free up storage space on your Dacast account at a later date, without actually deleting the file from your account, you can remove some of the bitrate copies to conserve space without eliminating the content available. If you need more transcoding credits, you can always purchase more in your Dacast account.
Conclusion

The multi-bitrate streaming option has been a feature of our video streaming solution since we debuted it in September of 2012, and we’re glad to continue to be able to offer this service to all of our customers.
Now that you know the basics of multi-bitrate streaming for your video content and how to add multi-bitrate streaming options for your viewers via your Dacast account, you should be ready to try this feature out for yourself.
To learn more about this topic, you can also check out our article on Wirecast Pro video broadcasting software with multi-bitrate streaming.
For regular tips on live streaming and exclusive offers, we invite you to join our LinkedIn group.
If you’re new to Dacast and interested to give us a try, we encourage you to sign up for our 14-day risk-free trial.
 Stream
 Connect
 Manage
 Measure
 Events
 Business
 Organizations
 Entertainment and Media
 API
API Tools
Tools Learning Center
 Support
 Support Articles