
The video experts blog
Closed Captioning Video for Education: Why it’s Needed

When it comes to industry news related to streaming solutions, we like to keep our readers up to speed. In recent years, regulations have increased in internet activity and media. One aspect of this shift relates to closed captioning video for education.
If you are an educational institute doing streaming video hosting, recent lawsuits have created reasons for concern. Read on for the full scoop on closed captioning video for education. This article also covers why CCV is more important than ever for on-demand video (VOD) content.
- What are Closed Captions?
- Why Use Closed Captions?
- How to Add Closed Captions to Videos
- Creating SRT / VTT Files: The Manual Way
- Creating SRT / VTT Files: The Automated Way
- Direct Editing SRT / VTT Files
- Adding Closed Captioning Video for Education with Dacast
What are Closed Captions?
Closed captions (abbreviated: CC) refers to the process of displaying text to offer interpretive information. For example, captions will display dialogue and audio cues (e.g., indicating music playing in a scene).
Closed captions function like subtitles. However, they differ in that they can go beyond providing text for dialogue only.
Why use Closed Captions?
On February 12th, 2015, advocates for the deaf filed federal lawsuits against M.I.T. and Harvard. The lawsuits were for violating anti-discrimination laws. The reason? Both institutions offered online lectures, courses, podcasts, and other educational materials without providing closed captions.
In fact, legislation has existed for Closed Captions since January 13th, 2012. However, online content has only been subjecting recently. Called the “Twenty-First Century Communications and Video Accessibility Act“, the regulation states:
Pre-recorded programming that is edited for Internet distribution must be captioned if it is shown on television with captions on or after September 30, 2013.
Due to its wording around previously televised content, there has been plenty of wiggle room in meeting this new industry standard. As such, the lawsuit against Harvard and M.I.T.

has been a defining one. It helped to spur efforts to place guidelines for media content from educational institutes. Once started, these guidelines work to ensure that video content is accessible to the deaf and hard-of-hearing. This is true regardless of whether the content was previously televised or not.
That said, there is no reason you can’t start adding closed captions to your content now. With that in mind, below is a guide for doing a closed captioning video for education with your VOD (video on demand) content.
How to add Closed Captions to videos
Before turning to closed captioning video for education in particular, let’s review some basic steps for adding CC to videos in general.
To display captions for video content, you first need a subtitle/closed caption file. This file contains both the text and time codes denoting when each line of text displays over the video content.
There are many file formats available for closed captions. The most common formats are SRT and VTT files. These formats are also the two that Dacast uses for its on-demand videos. Below are instructions for creating a closed caption file.
Creating SRT / VTT Files (the manual way)
First, you can create SRT and VTT files through simple text editors. However, many users will be glad to know of several methods that aid in the manual creation process. Additionally, Many free solutions are available, meaning less of an impact on your budget. We recommend using these methods, rather than directly editing the files in a text editor. Why? They can provide a preview of the video, which is very helpful.
Below are some suggested methods:
Aegisub
Aegisub gets a salute for being widely available over several platforms. It comes with some extra bells and whistles as well. These features include a spellchecker to help with the process, although this is an added download.
While early versions did not support playback, newer versions do. This way, you can watch the video, pause it, and keep yourself in sync as you visually add the subtitles and check your progress. This makes it easy to avoid annoying delays or captions that appear too soon.
Finally, Aegisub gets a special nod for working over various platforms as well, rather than just Windows.
Subtitle Workshop
This program, like the others, includes a video preview option to let you watch the video while you create captions. It includes a powerful undo-redo structure as well.
Subtitle Workshop also includes ways to convert various text files. Therefore, if you have a different subtitle/caption file format and need it in SRT, Subtitle Workshop can be your solution.
Sadly the program is only available over Windows.
Subtitle Edit
The aptly titled Subtitle Edit program lets you playback video content while creating subtitles.
Like Subtitle Workshop, it also features ways to convert different text files. That way, if you have a format outside of SRT and VTT, you can convert it and work on it.
Also like Subtitle Workship, unfortunately, this program is only available over Windows.
Creating SRT / VTT Files (the automated way)
If you have money to spend, or if manual caption creation seems daunting, there are several paid options as well. We recommend Encoding.com’s Automated Closed Captioning Process & Workflow. By providing a video file, the service returns return a caption file of your preference, including SRT and VTT files. Encoding.com has a great reputation; it is trusted as the source of encoding video files over Dacast online video platform.
Despite the reputation, it pays to double-check the video content afterward. This is especially true if you opt for a solution without a long track record. Case-in-point: part of the lawsuit against Harvard and M.I.T. centered on content that “was inaccurately captioned or was unintelligibly captioned, making it inaccessible.”

In short, a crude closed caption job might deter some criticism, but it’s not a comprehensive defense.
Direct Editing SRT / VTT Files
Of course, sometimes you need to get your hands dirty and edit the files directly. For example, if an automated method cannot deduce the speech of someone who slurred their words, and you’ll need to correct it.
Thankfully, you can do this via any basic text editor. Notepad on Windows is a great example. The two file formats (mentioned above) are quite different in terms of structure, however.
VTT files look like this:
00:00:08,000 –> 00:00:11,000
Education is the future.
00:00:12,500 –> 00:00:19,500
Not for those at a certain income level but for all!
SRT files are a bit more gangly and appear like this:
SubtitleNumber: 9
StartTime –> EndTime
SubtitleText
Blank Line
e.g.
001
00:00:08.000 –> 00:00:11.000
Education is the future.
002
00:00:12.500 –> 00:00:19.500
Not for those at a certain income level but for all!
You can edit both from within your text editor. Then, you can save these new files with any edits you have made to the text.
How to add a Closed Captioning Video for Education on Dacast
Video file? Check!
Subtitle file? Check!
Once you have both of these components, you are ready to start providing closed captioning video for education–or any other context! First, log in to your Dacast account. Then, upload a video file to your account to create a video on demand. If you need help uploading a file, consult our walkthrough.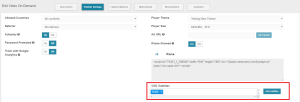
Once the file has been uploaded, click on the video and go to PUBLISH SETTINGS. Click the “+ Add Subtitle” button. The lightbox gives you a language dropdown. This lets you add multiple languages that can be associated with the same video file. Choose the language that is appropriate for the video text file you plan to upload. This is something your viewers will see once they click the CC button inside of the player.
After you select the language, you can click the CHOOSE FILE button. This will let you search your hard drive or removable storage device for caption/subtitle files. These files must be either SRT or VTT.
After uploading, simply click the CREATE button. This will associate the captions with your video file. And that’s it!
Additionally, if you have more language files you would like to add, you can click the “+Add Subtitle” button again to restart the process.
Conclusion
In this article, we’ve covered closed captioning video for education, and many other uses. After reading, we hope you feel more confident in adding captions to your video files. Though it’s not a quick process, and it might seem daunting at first, it will become easier with time.
Have any tricks of the trade you use in creating caption files? Sound off in the comments below to share your advice. We love to hear from our readers, and we will get back to you.
For regular live streaming tips and exclusive offers, you’re welcome to join our LinkedIn group as well.
Finally, if you’re not yet streaming with Dacast, we’d love for you to give our online video platform a try! Click the link below to access our 14-day free trial (no credit card required). We’ll have you up and streaming in a matter of minutes.
As always, thanks for reading and best of luck with your video broadcasts.