
The video experts blog
FFmpeg Live Streaming – What Professional Broadcasters Need to Know [2022 Update]

Many professional broadcasters use live streaming software in addition to their online video platforms. Video streaming software typically provides tools for encoding, transcoding, adding on-screen effects, and more.
If you are looking for a no-frills, lightweight tool for broadcast live stream production and other video tasks, FFmpeg may be the software for you. You can use FFmpeg to create rtmp streams.
This feature-rich tool is primarily designed for advanced broadcasters. To help lower the learning curve, we’ve put together this guide to break down some of the code and functions available on FFmpeg. This FFmpeg tutorial will help you understand how it works.
In this post, we’ll cover how to set up FFmpeg on Linux, Mac, and Windows, and how to use FFmpeg to broadcast live streams. We’ll also provide a brief walkthrough on how to use the software with our own live streaming platform. This FFmpeg tutorial will cover what you need to know to use FFmpeg for streaming.
Let’s get right into the basics of FFmpeg live streaming and its useful tools.
Table of Contents:
- What is FFmpeg?
- What Can You Do With FFmpeg?
- How FFmpeg’s Live Streaming Tools Work
- How to Download and Setup FFmpeg
- How to Use FFmpeg for Live Streaming
- How to Live Stream Using FFmpeg and Dacast
- Conclusion
What is FFmpeg?
What is FFmpeg? FFmpeg is a streaming software that is designed for converting, recording, splicing, editing, playing, encoding, muxing/demuxing, and streaming multimedia files. It works with audio, images, and video in basically any codec or format used in the past 20 years.
FFmpeg is free and open-source, meaning anyone can download the software without any cost. Developers may also be able to integrate FFmpeg into other projects.
This program is a command-line utility, which means that FFmpeg isn’t built around a Graphical User Interface (GUI). Instead, it’s an application that accepts commands via “command-line interfaces” (CLI), which means that a little bit of technical know-how is required.
If you’ve ever used a Unix-based computer such as Linux or macOS, you may have used the “terminal” application. On Windows, MS-DOS and the more modern “Powershell” provide a command-line interface.
Power users, system administrators, developers, and others working with complex code generally prefer a CLI. Often, system administration tools are only available via CLI. Scripting, automation, and other advanced tasks are often easier via CLI. Thus, FFmpeg serves this audience by providing multimedia tools from the command line. FFmpeg programs require a little coding knowledge.
What Can You Do With FFmpeg?
FFmpeg has a wide range of capabilities for live video streaming. With FFmpeg, users can do the following:
- Convert between different file formats and codecs (i.e. encoding)
- Adjust bitrate (both audio and video)
- Adjust volume, remove audio and/or merge an audio file with a video file
- Remap a mono audio source to stereo channels
- Crop, scale or rotate a video file
- Recording input from a webcam or other video source
- Broadcast live stream a video feed
When it comes to multimedia, there isn’t much that FFmpeg can’t do. Live streaming and video creation with FFmpeg is very diverse, and allows you to do just about anything you want to a video.
If you’ve used image editing, video editing, or audio editing software, you’ve probably used FFmpeg before. Given its free and open-source nature, many other applications with a GUI use FFmpeg to provide backend processing. You could easily have worked with FFmpeg online without knowing it.
It is important to emphasize that FFmpeg is NOT an encoder for beginners looking to broadcast live streams. New broadcasters would be better off starting with a free encoder such as OBS Studio. They could also consider investing in paid encoding software options, such as Wirecast, vMix, and VidBlasterX. FFmpeg is for people with more advanced knowledge of coding and broadcasting.
How FFmpeg’s Live Streaming Tools Work

As far as live video stream software goes, FFmpeg provides a relatively wide variety of tools. FFmpeg supports many video and audio inputs that are accessible to your computer. These include webcams, USB microphones, and cameras that connect via capture cards.
Additionally, you can specify an output as an RTMP stream aimed at your streaming platform. FFmpeg will accept your login information to allow you to stream to this destination. This provides a simple command-line interface live streaming functionality. In this case, FFmpeg acts as the live encoding software. You can use FFmpeg to livestream.
One important application of FFmpeg concerns mixing a complex live production. For this function, you may want to have one powerful computer dedicated to capturing feeds from various cameras. You need a lot of processing power in order to mix complex live productions.
An engineer stationed at this camera then mixes video content in real-time. Then, the engineer can output a feed to another computer running FFmpeg. This computer, in turn, can broadcast live streams as the final result. FFmpeg offers real time transcoding and streaming.
This setup effectively divides the processing load between multiple machines.
How to Download and Setup FFmpeg
In order to use FFmpeg for live streaming, you must first download the software.
The easiest way to download FFmpeg is from the website directly. The installation will look different depending on what operating system you use.
Here is a brief walkthrough for setting up FFmpeg on Linux, macOS, and Windows.
1. Linux Installation
The FFmpeg website has Linux packages for Debian, Ubuntu, Fedora, and Red Hat Enterprise Linux. Many other distros should be able to easily install FFmpeg using their location variation of the install command. For example:
sudo apt-get install ffmpeg
However, we recommend compiling FFmpeg yourself because this approach allows you to stream RTMP videos via the librtmp library. To do so, we’ll use Ubuntu as our example distro.
To start, run the following commands:
$ sudo apt-get update
$ sudo apt-get install build-essential git libssl-dev
Then, retrieve the librtmp source code on the official git repository.
$ git clone git://git.ffmpeg.org/rtmpdump
Next, browse the local repository’s folder. Once there, run the compilation process.
$ cd rtmpdump
$ cd librtmp
$ make
Next, install the library in your system’s root directory.
# DESTDIR=/usr make install
Then, you need to install and manually compile libaacplus. You also need to install other dependencies. At this point, you’ll run the following commands:
$ sudo apt-get install libfftw3-dev pkg-config autoconf automake libtool unzip
$ wget https://tipok.org.ua/downloads/media/aacplus/libaacplus/libaacplus-2.0.2.tar.gz
$ tar -xzf libaacplus-2.0.2.tar.gz
$ cd libaacplus-2.0.2
$ ./autogen.sh –enable-shared –enable-static
$ make
$ sudo make install
$ sudo ldconfig
# apt-get install yasm libfaac-dev libfdk-aac-dev libfreetype6-dev libmp3lame-dev libopencore-amrnb-dev libopencore-amrwb-dev libopenjpeg-dev libopus-dev libschroedinger-dev libspeex-dev libtheora-dev libvo-aacenc-dev libvorbis-dev libvpx-dev libx264-dev libxvidcore-dev
Now, you’ll retrieve the ffmpeg source code from the official git repository:
$ git clone https://github.com/FFmpeg/FFmpeg.git
Browse to the local repository’s folder, then run the compilation process:
$ cd FFmpeg
$ ./configure –enable-gpl –enable-version3 –enable-nonfree –enable-postproc –enable-libaacplus –enable-libfaac –enable-libfdk-aac –enable-libfreetype –enable-libmp3lame –enable-libopencore-amrnb –enable-libopencore-amrwb –enable-libopenjpeg –enable-openssl –enable-libopus –enable-libschroedinger –enable-libspeex –enable-libtheora –enable-libvo-aacenc –enable-libvorbis –enable-libvpx –enable-libx264 –enable-libxvid –prefix=/usr/local –enable-librtmp
$ make
Finally, use this code to install ffmpeg in your system’s root directory:
# make install
2. macOS Installation
As with Linux, we recommend macOS users compile a custom build of FFmpeg. You can do so with the help of the Brew package manager.
You’ll also need to install Command Line tools. To set up these dependencies, use the following commands in the “Terminal” application, then follow any prompts that may appear:
xcode-select –install
/usr/bin/ruby -e “$(curl -fsSL https://raw.githubusercontent.com/Homebrew/install/master/install)”
Once you’ve set up Command Line tools and Brew, you’re ready to install FFmpeg.
Use the following commands in your terminal:
First, install librtmp with brew:
brew install librtmp
Then, install libx264 with brew:
brew install libx264
Next, install libfdk-aac with brew:
brew install fdk-aac
Finally, install FFmpeg with all the specific libraries:
brew install ffmpeg –enable-libfdk-aac –with-x264 –with-rtmpdump
3. Windows Installation:
Windows users can install FFmpeg using pre-built packages on the “Builds” page of the FFmpeg website.
How to Use FFmpeg for Live Streaming
To start live streaming with FFmpeg, you have to download and install the software on your computer. You can choose the right installation method for your operating system from the three options above in this FFmpeg tutorial.
At this point, you can also create a streaming channel on your video hosting platform.
Once FFmpeg is installed on your computer, it is time to connect it to your video hosting solution. You can connect FFmpeg as an encoder. Your video hosting manager will provide credentials to enter into FFmpeg.
These credentials are typically found in the encoder setup section of your streaming channel on your video hosting platform, and they include the login, password, stream name, and stream URL.
From there, you’ll need to input the credentials in FFmpeg. You’ll need to paste the following snippet of code into the text editor or CLI:
$ ffmpeg -re -f lavfi -i testsrc -c:v libx264 -b:v 1600k -preset ultrafast -b 900k -c:a libfdk_aac -b:a 128k -s 1920×1080 -x264opts keyint=50 -g 25 -pix_fmt yuv420p -f flv “rtmp://p.ep246802.i.akamaientrypoint.net/EntryPoint flashver=FMLE/3.020(compatible;20FMSc/1.0) live=true pubUser=123456 pubPasswd=789123 playpath=dclive_1_1@246802”
You’ll need to replace the “rtmp://…” text with your Stream URL link, set “pubUser” to your login, “pubPasswd” to your password, and “playpath” to your Stream Name.
When you execute this command, you will begin an x264 live stream at 480p resolution (downscaled from 1080p HD) at 1600 kbps bitrate, with a 900kb buffer.
Important Notes about FFmpeg Live Streaming
Here are some other things to keep in mind when live streaming with FFmpeg:
- You should also replace “-f lavfi -i testsrc” with “-i” then the source of your own camera feed or other program feed (-i /your_source_path). Otherwise, you will not have your live stream but only the test screen.
- A recurring typo in fdk aac usage during the installation process, you need to enter “–enable-fdk–aac” but when you use it in the command it is “-c:a libfdk_aac”
- For better quality, you can change the “preset” flag to “fast” rather than “ultrafast.”
- If you want low latency, you can add the flag “-tune zerolatency” directly after the preset flag. Both of these commands require additional processing power.
- To increase the buffer size for smoother playback, replace “-b 900k” with “-buffsize 3000k.”
- Make sure you’re using the best settings for you. These include setting video and audio bitrates according to your internet connection, resolutions consistent with those bitrates, and keyframe intervals at 2s.
Check out our dedicated guides for using FFMPEG with Dacast on Linux and Mac.
How to Live Stream Using FFmpeg and Dacast
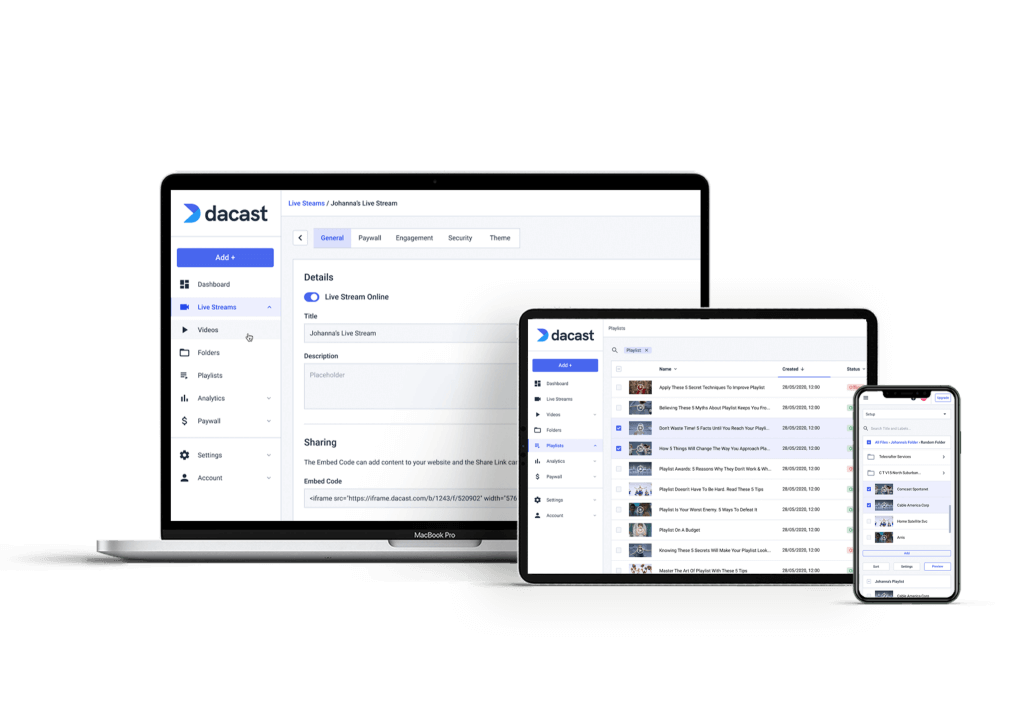
Once you’ve downloaded and set up FFmpeg, you’re ready to broadcast a live stream over Dacast. We offer secure video upload and many other features to make streaming live accessible to all kinds of broadcasters.
Let’s take a look at the three steps for setting up FFmpeg to live stream via Dacast. This is a simple FFmpeg tutorial for working with Dacast.
1. Open Dacast’s Encoder Setup
First, you need to gather the encoder setup information from your Dacast account.
In a web browser, visit the Dacast website and log in to your account. Click on (or create) the live channel you wish to stream on, then click on “Encoder setup.”
Select “Other RTMP encoder” on the left side of the screen.
2. Find Your Credentials
On the right side of the screen, copy down these pieces of information: Login, Password, Stream URL, and Stream Name.
3. Run The Following Command
Next, copy the command into a text editor or directly into your CLI as we described in the general FFmpeg tutorial above. Make sure to properly input your stream URL, login, password, and stream name.
Again, the command should look like this:
$ ffmpeg -re -f lavfi -i testsrc -c:v libx264 -b:v 1600k -preset ultrafast -b 900k -c:a libfdk_aac -b:a 128k -s 1920×1080 -x264opts keyint=50 -g 25 -pix_fmt yuv420p -f flv “rtmp://[STREAM URL] flashver=FMLE/3.020(compatible;20FMSc/1.0) live=true pubUser=[LOGIN]Passwd=[PASSWORD]playpath=[STREAM NAME]
Once that command has been inserted, you should be ready to stream.
Please check out our encoder setup guide for a more detailed tutorial on setting up FFmpeg and other similar software with Dacast.
Conclusion
FFmpeg is a bit complex since it uses a command-line interface, but there’s no denying that this powerful piece of software is highly useful in the right situation and with the right knowledge. We hope that this FFmpeg tutorial article has provided you with the tools and the confidence to use FFMPEG to broadcast live streams.
For regular tips on live streaming and exclusive offers, we invite you to join our LinkedIn group.
Are you searching for a live streaming and video hosting platform to support your broadcast live stream projects? If so, why not give Dacast a try? We offer a 14-day free trial (no credit card required), and we’d love to get you set up to test out all our features today!
Thanks for reading, and good luck with your live broadcasts!