
The video experts blog
Best Chroma Key Software Encoder Comparison

In this video tutorial, we will provide a comparison of the Chroma Key features in the live streaming encoders; Wirecast, Xsplit, vMix, and OBS. “What is the best chroma key software encoder?” has no simple answer, so we will explore the Chroma Key features of all of these encoders.
Chroma Key, or Chroma Keying, is a technique where part of an image is removed based on its color. This can be done live or in post-production, in video, or in photography. In this case, we’ll be looking at video broadcast software. By using chroma key you can layer multiple video sources together to create one seamless composition.
It is more commonly known as Green Screening or Blue Screen. The actual color of the screen isn’t critical. All that really matters is that the screen is a bold, strong color that isn’t being used elsewhere in the shot.
Wirecast Chroma Key
To use Chroma Key in Wirecast, first of all, add a video source. Click on the ‘+’ icon next to a blank shot, select the ‘camera’ icon, and add the video source you want.
Right-click on the video source and select “Edit Shot”. This will open a new window. Under the video preview click the ‘Face’ icon to “Configure Chroma Key Settings”.
Select “Use Chroma Key” to turn it on, then adjust the settings until you have the effect you want. Click “Pick Colour with Mouse” to select the color of your screen, by clicking in the preview of your Edit Shot window.
For a tutorial on how to use Wirecast with Dacast, follow this link
Xsplit Chroma Key
With Xsplit, we have a number of options for Chroma Key. Start by adding a video source by going to “Add Source” -> “Webcam” and selecting the web camera you want.
Right-click on the source under “Scenes” which will open a new window. Choose the tab “Color” and under “Keying”, choose the Chroma Key option.
Xsplit will automatically remove the color you have selected under “Key Color” which can either be Red, Green, or Blue. Adjust the sliders to the right to get the effect you want.
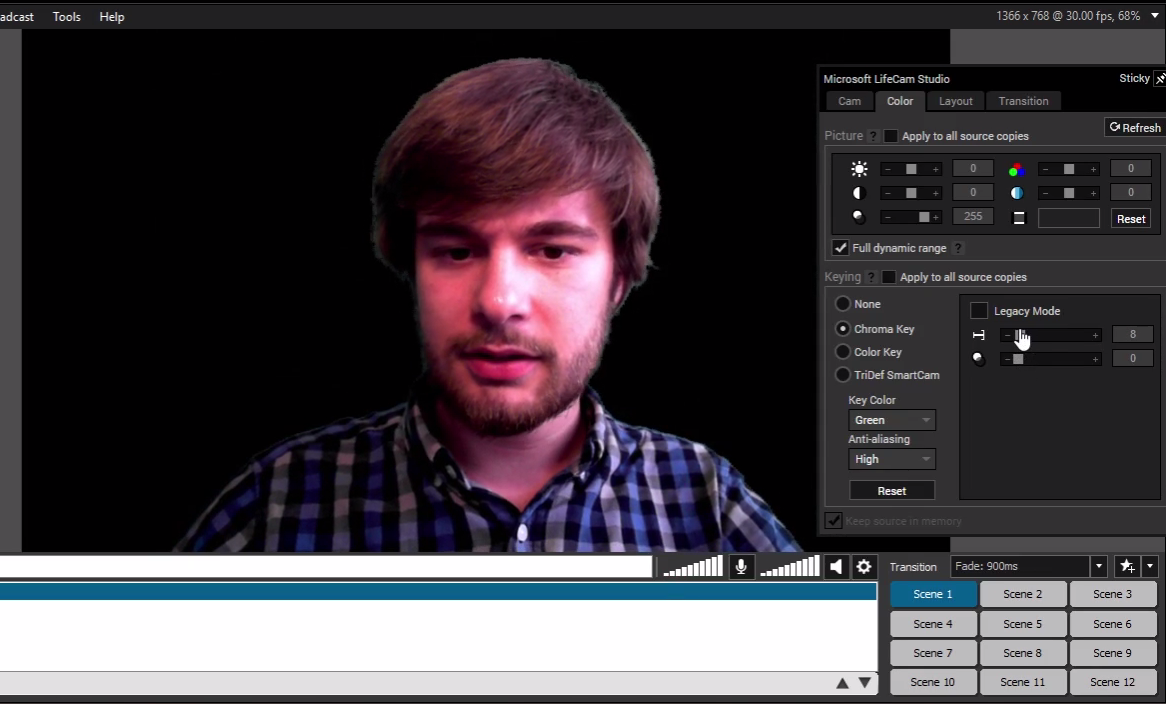
If you are unable to get an effective Chroma Key effect, try selecting “Legacy Mode”. This will give you the “Eyedrop Tool”. Click this button, and then on your screen, to set the Chroma Key to that color. Again, adjust the sliders until you achieve the effect you want.
Another option is “Color Key”. It has the eyedrop tool and will give RGB sliders to choose exactly the color you want. However, it can be more difficult to get the effect you want compared to Chroma Key.
Alternatively, you can purchase the 3rd party product, the TriDef Smartcam. This does not require a green screen, blue screen, or a screen of any color! It recognizes the shape of your body and removes the background accordingly. However, it does struggle if there is light or movement coming from behind the person in front of the camera. I’d recommend using a screen anyway to achieve the best results.
vMix Chroma Key
Start off by adding a video source, by clicking “Add input” in the bottom left corner. In the window, it opens, selects “Camera” and in the drop-down menu, choose the camera source you want.
To get to the Chroma Key options, double click on the source, or select the ‘Cog’ icon next to it. In the next window. Go to “Colour Key” to open the Chroma Key options.
Select “Colour Key” to turn it on. Use the eyedropper tool (between the colored square and the color palette) to set the color to your screen.
You can use the “Auto Chroma Key” button, or click “Chroma Key Filter” and adjust its slider to get the effect you want.
For a tutorial on how to use vMix with Dacast, follow this link
OBS Chroma Key
First of all, we’ll need a video source. Right-click under “Sources:” -> “Add” -> “Video Capture Device”. This will prompt you to name the source, and then launch a new window where you can choose the camera you want under “Device:”
In this same window, we can add Chroma Key by selecting “Use Chroma Key” in the bottom left. However, we will need to click “Ok” and then “Preview Stream” first. Right-click on your video source and select “Properties”.
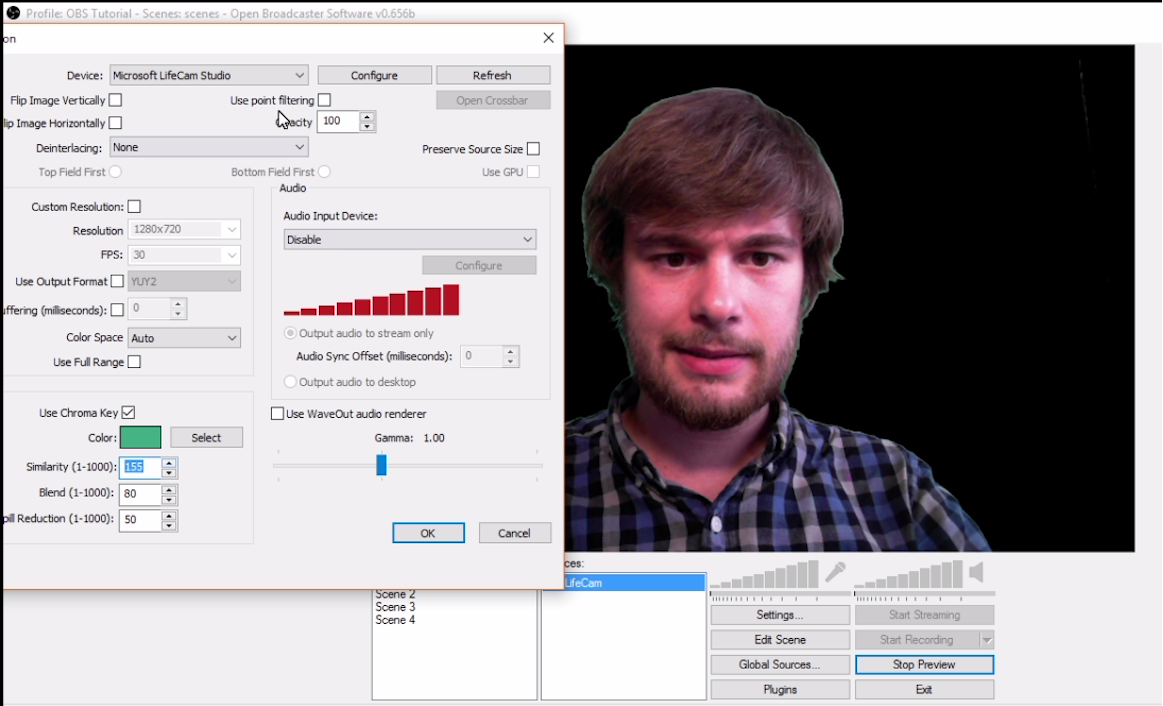
Now you can set the Chroma Key color to the color of your screen by hitting “Select”, and click on the screen in your preview. Adjust the Similarity, Blend and Spill Reduction until you have the effect you want, then click “OK”.
For a tutorial on how to use OBS with Dacast, follow this link
Chroma Key Tips and Tricks
You now know how to use Chroma Key in Wirecast, Xsplit, vMix, and OBS, but let’s take a moment to give you some advice on how to create the best effect.
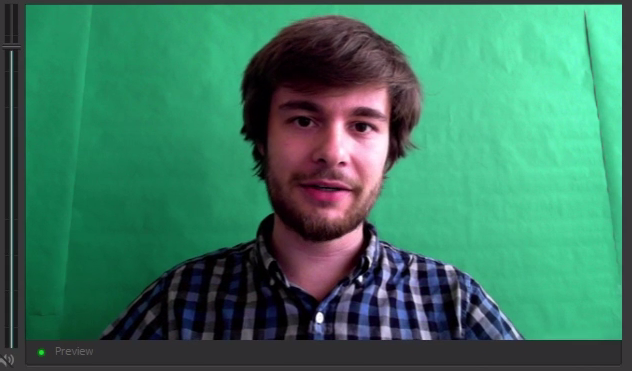
When it comes to choosing the color of your screen, typically people choose Green. This is because it is a color that people rarely wear (usually). Also, unlike red and blue, it is far less likely for Chroma Key to see these colors in your skin or hair.
However, there can be instances where a Blue Screen is preferable, and you can read our guide on that subject here.
You can buy a Green Screen online for $20-$100 or more depending on what you want to get, but even a green card or paper will do the job if you have a wall to tape it to.
What important is that your Green Screen doesn’t have tears or creases. Keep it smooth and clean. You can use multiple sheets if your screen doesn’t fill the whole space of the shot, but make sure you have some overlap to avoid the background coming through. You can use clear sellotape to keep the overlapping pieces flat.
We’ve got a full article on professional versus DIY materials here.
Finally, light is very important when using Chroma Key. If your screen has shadows on it, it will be much harder for your encoder to recognize the color it is supposed to be removing.
Get as much light onto your green screen as possible to remove as much shadow as you can. Having two lights on either side of your camera is a great start.
If you have lots of outside light, you can use that, but that depends on where your windows are. If you decide to use electric lights, close the curtains and blinds. You don’t want the light of two different intensities and color (indoor and outdoor) in the same shot. I’ve gotten the best effects with my green screen when the sun has gone down, and there is no external interference.
Chroma Key Comparison
So which live video streaming encoder has the best Chroma Key function?
Well, considering all the other features you’ll want in an encoder, I don’t think there is one right answer.
I got the best Green Screen effect with the least effort from Wirecast and OBS. However, I liked that Xsplit had lots of options in its Chroma Key settings, as well as lots of different ways to do Keying.
This means that if I was unable to get the effect I want in another encoder, I would probably try it in Xsplit as it had the greatest range of Chroma Key options.
That being said, it still worked perfectly well in vMix and was simple to use. Ideal for personal use. However, I might choose a different encoder if my broadcast was going to heavily focus on using a Green Screen.
We hope this tutorial video has been helpful to you. If you have any questions, or suggestions for future tutorials, feel free to leave a comment below.