
The video experts blog
The Broadcaster’s Guide to Video Capture Devices for Live Streaming [2024 Update]

Professional streaming setups have many moving parts. There the video cameras, online video platforms, and encoders, but there are also many miscellaneous tools used in streaming that are often overlooked. One of these tools is a video capture device.
We cover everything you need to know about video capture devices for recording video and live streaming. We discuss what they are, key features, and how to choose one. Finally, we help you navigate how to choose the best one for live streaming.
Table of Contents:
- What is a Video Capture Device?
- The Technical Background of Video Capture Devices
- How to Choose the Right Video Capture Device
- Best Video Capture Devices for Live Streaming
- Conclusion
What is a Video Capture Device?
A video capture device, which is also called a “video capture card,” is a piece of hardware that connects your live streaming camera to your computer. Video capture devices are mostly used with PCs, but they can work with laptops that have the proper ports.
The reason that broadcasters use video capture devices is to connect their external stream sources to the video streaming platform that is operating on their computer.
Types of Video Capture Devices
There are two main types of video capture devices. These include USB devices that need their software to work and PCI Express (PCIe) ones that support plug-and-play.
The latter is preferred since it is easier to use since it doesn’t require the support of drivers. They usually connect through the PCIe adapter slot inside a desktop or rack system.
There is also the small form factor, Mini PCIe version or Newer M.2 standard. These cards have the benefit of being connected directly to the system, which enables higher performance. This higher performance also allows for multiple input channels on one device.
Video-switching software packages like Wirecast or vMix are a perfect match for cards with multiple capture channels for multi-camera webcast production.
The Technical Background of Video Capture Devices
Over the last ten years, the video industry has transformed from Standard Definition (SD) to High Definition (HD), to Ultra High Definition (Ultra HD or UHD). This transition has affected all of the technology that brings live streams to life.
Let’s take a look at a few of the different technological elements that keep video capture devices running with different streaming setups.
Signaling
Your video capture device needs to support the signal format which you have available as an input. This may be as simple as an HDMI consumer camera that supports 1080p or 720p.
It all started with the National Television System Committee (NTSC) back in 1953 when the original TV standards were formed. They outlined that in North America, a TV image containing 525 horizontal lines (483 are visible) would be interlaced, meaning that only half (alternating) lines are rendered in each frame.
Today this early standard is known as Standard Definition (SD).
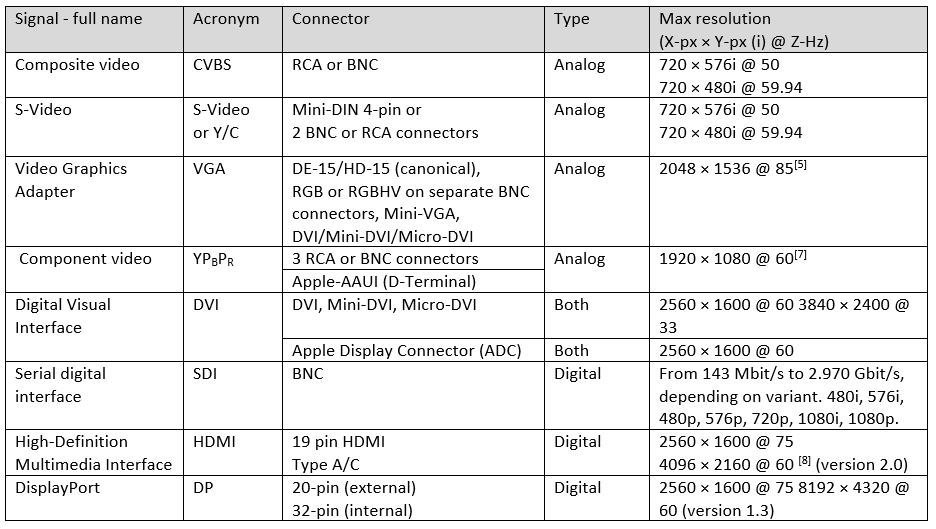
Below is a chart of signal types and the connectors that are commonly used with them.
Interlacing
Interlacing was a method for cheating since there wasn’t enough over-the-air bandwidth for a single frame. They split alternating lines into two frames and the phosphors in the old tube TVs glowed long enough for the alternating lines to blend.
Interlacing is still used in HD applications to lower the amount of data needed for the same effective resolution. While there are no longer phosphors used in displays the time on screen is so short that your eye cannot tell that you are only seeing half the image at once.
The DVD was the industry’s first implementation of digital technology and specified a method for converting analogue video signals into digital data and storing it on DVD media. The effective resolution was 640×480 and referred to as 480i, the “i” meaning it was interlaced.
While the DVD was revolutionary at the time, the next wave of change to fully digital TV was even farther-reaching and enabled higher resolutions. The new specifications provided for the whole TV ecosystem to be digital from the camera to display, including over-the-air broadcast signals.
The new digital TV rules only guide how signals are handled, as opposed to the single mandated resolution of the early NTSC standard. This allows for a broad range of signals and causes lots of confusion, particularly with what we refer to as “HD.”
The easiest way to think about a signal format is by its resolution. Common designations for HD are 1080p and 720p. The number is the frame height in pixels, while the letter “i” or “p” is the interlacing method (or lack thereof). As we mentioned above, “i” means Interlaced, rendering alternating lines in each frame. “P” means progressive, which means there is no interlacing and all lines are rendered in every frame.
As you would guess, progressive delivers a better picture, because each frame contains a complete image, unlike interlaced, which is like looking at a picture through a fast flickering window blind.
However, progressive content consumes twice the data to render the same video as an interlaced signal. This is especially important when the signal is broadcast over the air, but not so important when being recorded.
Aspect Ratio
The last component of the signal is the frame aspect ratio. The aspect ratio describes the shape of the viewing frame, with width to height being the multiplier used to determine the final resolution of the frame. Standard Definition is most commonly in 4:3 aspect and HD being 16:9.
4k is the newest term in the video industry. This term was originally coined by the Digital Cinema Initiative and refers to the horizontal resolution of 4000 pixels. DCI’s specification is 4096 x 2160. By comparison, Ultra HD (UHD), the standard used for consumer 4K TVs, is 3840 x 2160. We could also call Full HD “2K” at its 1920×1080. But we don’t.
Below is a chart that outlines common digital signals and resolutions.

The Connections
There are two sides to a video capture device: the input and the output.
The input accepts the incoming signal to the device and determines how the device connects to the computer to output the digital signal. The input comes in many variations. The most common connection is HDMI for consumer sources and SDI for professional sources. However, there are several other sources as well: DVI, VGA, Component, and Composite to name a few.
The connection to the computer falls into two main categories: internal and external devices. External devices usually connect via the Universal Serial Bus (USB) but some systems also have a Thunderbolt connection which is popular on Apple Mac systems. USB is the easiest method to add a video capture device to your system.
Most modern systems support USB 3.0, which allows for connecting HD and Ultra HD devices.
How to Choose the Right Video Capture Device
Now that you understand the ins and outs of video capture devices, you can focus on your needs and decide what type of device is best for your application.
This leads to three questions about your specific needs.
1. How many video sources are you using? A single camera or multiple video sources?
This is the first question you must answer. If your project only requires a single camera (or video source), then a USB device will likely be your best bet. We recommended the Magewell USB Capture line of driver-free devices. It’s as simple as it can get – truly plug and play.
The USB Capture family is available with HDMI or SDI input. The USB Capture Plus line comes in HDMI, SDI, and DVI models, with signal loop-through (out) on the HDMI and SDI versions, and analog audio input and output.
If you need more than one source available to your software, then a PCIe capture card would be best. Magewell has a complete line of PCIe capture cards with a vast array of input options. These cards come with one, two, and four channels on a single card.
2. Does your solution need to be portable?
A USB device might be the best option if portability is important. Otherwise, you might want to consider a purpose-built system like the StreamDynamics StreamMini X4. This compact, small-form-factor system incorporates the Magewell Pro Capture Quad card, which provides four live camera sources to your software.
3. What type of output connectivity does your camera or switcher support?
In general, the most common digital signal is HDMI, which is available from both consumer and professional cameras. SDI is also a common video output professional signal.
The biggest difference between HDMI and SDI is that SDI cables can run a much longer distance before losing signal strength. Depending on the age of your equipment, it may also support several other types and connections (such as composite, s-video, or component video; and balanced or unbalanced analog audio). Once you know the type of output and signal format you will be using, select a video capture device that supports it.
It’s also worth noting the all-in-one class devices which have a single capture channel and allow you to select from a broad array of a/v input types, from analog to digital and SD to HD. There is even a 4K all-in-one card that spans from SD to 4K capture resolutions.
Best Video Capture Devices for Live Streaming
We’ve rounded up some of the best video capture devices for live streaming. Here are our top picks:
- Elgato HD60 S+ ($192.99)
- Atomos Ninja V ($599)
- ASUS TUF CU4K30 (~$399)
- Elgato 4K60 S+ (~$199)
- AVerMedia Live Gamer MINI – GC311 ($99.99)
As you compare options, be sure to check that your video capture device of choice is compatible with your streaming setup.
Conclusion
For choosing the best video capture device, remember that USB capture devices are highly portable and easy to use. And PCIe capture devices are designed with high performance—including video quality and audio quality—across multiple channels in mind.
When selecting a video capture device, follow these three steps:
- Step 1: Select your input type and video format
- Step 2: Select the number of channels you desire
- Step 3: Select the type of device interface – USB or PCIe
While there’s a lot of technical information to digest, we hope this guide has made things clearer. With a quality capture device suited to your needs, your live-streaming videos can be even better.
Need a professional-grade streaming solution? Try Dacast. Dacast is an all-in-one streaming platform designed for broadcasters looking to up their game. With Dacast, you can record videos of the highest quality and create engaging content that can be stored, monetized, and shared around the world.
You can try Dacast and all its features free for 14 days.
For exclusive offers and regular live-streaming tips, you can also join our LinkedIn group.